7fce12d2cc785f7066f86314836c95ec
). The file claimed to be an installer for the JXplorer 3.3.1.2, a Java-based “cross platform LDAP browser and editor” as indicated on its official web page. Why was it strange? Mostly because I did not expect an installer for a quite popular LDAP browser to create a scheduled task in order to download and execute PowerShell code from a subdomain hosted by free dynamic DNS provider:
I initially planned to keep this write-up short and focus on dissecting suspicious JXplorer binary. However, analyzing the JXplorer binary turned out to be only the first step into the world of backdoored software.
In order to validate my VirusTotal finding I downloaded a matching version of Windows installer (3.3.1.2) from the official JXplorer SourceForge repository. Unsurprisingly, the MD5 hashes of both files were different. Last thing I wanted to do was to disassemble two 7 megabytes PE binaries so I started with simpler checks in order to locate difference(s). As binaries were packed with UPX, I unpacked them with the upx
tool and compared MD5s of PE sections. The sections were all identical, with exception of the resource section. I was not sure how content of the PE resource section could affect behavior of the installer so I used VBinDiff to see the exact difference. The tool actually revealed the following modifications:
requestedExecutionLevel
property. The original file required Administrator privileges (requireAdministrator
) while the modified was fine with running with caller’s privilege levelhttp-2.7.9.tm
, platform-1.0.10.tm
):The first two differences did not seem to be important so I focused on the last one. The identified ZLIB data was placed in the PE file overlay space and I figured that it was likely part of an archive used by the installer to store JXplorer files. Fortunately, JXplorer web page mentioned that JXplorer was using the BitRock Install Builder and after short search I managed to find the following Tcl unpacker for BitRock archives: bitrock-unpacker.
Once I installed the ActiveTcl and downloaded required SDX file I used the bitrock-unpacker
script to unpack JXplorer installation files from both installers. Then I used the WinMerge tool to compare resulting files and directories. To my surprise there were no differences which meant that JXplorer application files were left intact. That also meant that I needed to dig a bit further.
After going through bitrock-unpacker
code I noticed that it first mounted the Metakit database in order to extract installer files that were used to locate and extract the Cookfs archive storing JXplorer files. Using existing bitrock-unpacker
code I created this Tcl script to dump all installer files from the Metakit database to disk. This time comparing BitRock installer files yielded interesting results.
WinMerge showed one difference - a file named http-2.7.9.tm
, located in the \lib\tcl8\8.4\
directory.
Despite having the same size and timestamps (atime
, ctime
, mtime
as extracted from the Cookfs archive) the file http-2.7.9.tm
(MD5: f6648f7e7a4e688f0792ed5a88a843d9
, VT) extracted from the modified installer did not remind standard http.tcl
module. Instead it contained exactly what I was looking for:
Below is the summary of actions performed by the http-2.7.9.tm
script:
Notification Push
to download and execute PowerShell code from hxxp://svf.duckdns[.]org
9d4aeb737179995a397d675f41e5f97f
, VT) to %TEMP%\..\Microsoft\ExplorerSync.db
. Create a scheduled task ExplorerSync
to execute ExplorerSync.db
533ac97f44b4aea1a35481d963cc9106
, VT) to %TEMP%\BK.jar
and execute it with the following command line parameters: hxxp://coppingfun[.]ml/blazebot
%USERPROFILE%\Desktop\sup-bot.jar
supremenewyork[.]com
Some of the actions were a bit odd to me (Why would you drop malware(?) to user’s Desktop? Why would you choose that specific domain supremenewyork[.]com
?). That got me thinking that I might be dealing with a testing version of modified installer. The names of files (blazebot
, sup-bot
) did not ring any bells either so I decided to do a bit of online research.
One of the top Google search results for the keyword blazebot
was this YouTube video created by Stein Sørnson and titled Blaze Bot Supreme NYC
. The video presented a process of downloading, running and configuring what seemed to be a Java-based sneaker bot (TIL!) called blazebot
/ Supreme NYC Blaze Bot
. Both the YouTube video content and its description referenced a source from which one can download blazebot: a GitHub repository steisn/blazebot [Wayback Machine copy]. Git commit messages for that repository contained following author entries: Stein Sørnson <ed.fishman392@mail[.]ru>
(sample commit message) suggesting that Stein Sørnson was the owner of both YouTube channel and GitHub repository.
With such unique name it was not hard to find another online account related to Stein Sørnson, this time on SourceForge - allare778 [Wayback Machine]. While the username was set to allare778
the full name was present in the profile page title:
The allare778
account owned three projects:
supremebot.jar
(MD5: 2098d71cd1504c8be229f1f8feaa878b
, VT), exactly the same file that was also present in the blazebot GitHub repository (as blazebot-1.02.11.jar
)There was also one additional detail concerning blazebot that started to make sense to me much later. While back then I did not have many reasons to analyze that sneaker bot I took a quick look at decompiled Java classes. The bot contained an update functionality that downloaded AES encrypted and RSA signed “update instructions” file from the other project repository belonging to the user allare778
:
hxxp://allesare.sourceforge[.]net/en-us/bver
The implementation of update mechanism seemed to allow project owner to execute arbitrary system commands on hosts running blazebot.
At that point I thought that the connection between modified JXplorer installer and the “Supreme NYC Blaze Bot” could be just coincidental. I took a step back and analyzed two JAR files extracted from the http-2.7.9.tm
Tcl script hoping that they will provide further clues.
This was a quick exercise as both JAR files turned out to contain compact downloaders/loaders. The BK.jar
file (MD5: 533ac97f44b4aea1a35481d963cc9106
, VT) contained the jdl
package implementing simple downloader. It was responsible for downloading data from URL provided as a first command line argument and then saving it to a file provided as a second command line argument.
The second JAR file ExplorerSync.db
(MD5: 9d4aeb737179995a397d675f41e5f97f
, VT) was more interesting as it contained two hardcoded URLs. The fen
package implemented an infinite loop trying to download and invoke Java code (from the fmb
package) from the following two URLs:
hxxp://ecc.freeddns[.]org/data.txt
hxxp://san.strangled[.]net/stat
While the san.strangled[.]net
did not have resolution at the time of analysis, the ecc.freeddns[.]org
DNS A record pointed to 207.38.69[.]206
, an IP address hosting Dynu’s web redirect service. The ecc.freeddns[.]org
was set to redirect HTTP requests to jessicacheshire.users.sourceforge[.]net
and fortunately the data.txt
file was still present there.
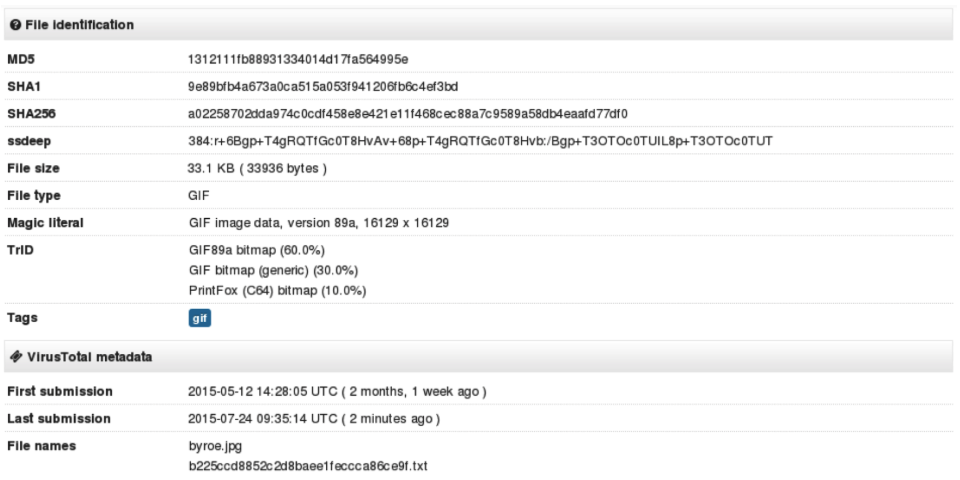
As expected the data.txt
(MD5: 65579b8ed47ca163fae2b3dffd8b4d5a
, VT) was a yet another JAR file. Going through decompiled code it was quite evident that code implemented functionality typical for a RAT. This is by no means a complete analysis of the code (there is much more ahead of us!) but I made following observations while skimming through the code:
FEimea Portable App - ver. 3.11.2 Mainline
. It also returned following version strings: Audio system : (none)
, Audio codecs : (none)
while it did not seem to implement any audio related functionalitylimons.duckdns[.]org
(TCP/13057) and polarbear.freeddns[.]org
(TCP/7003)hxxp://utelemetrics.atwebpages[.]com/update.php?tag=<ROT13_DATA>
hxxp://ecc.freeddns[.]org/a2s.txt
(not available at the time of analysis).gitconfig
file located in user’s home directoryAt that point I ran out of files to analyze but at the same time suspected that with the existence of the FEimea Portable App there is likely much more to this story than just someone playing with the JXplorer installer. I made an assumption that while I might have stumbled upon a testing version of the modified installer there might be other versions floating around. I also expected that some distribution channel for modified installer must exist.
I set out for a hunt. I downloaded latest Windows version (3.3.1.2) of the JXplorer installer from its official website and I compared MD5 hash with installer file hosted on the official GitHub repository pegacat/jxplorer. They were the same (MD5: c23a27b06281cfa93641fdbb611c33ff
). I did the same with JXplorer installer files downloaded from multiple software hosting websites. Same results. I repeated the process with files grabbed from SourceForge mirrors. All good. Then I searched for JXplorer on GitHub:
If not the number of stars assigned to the repositories I would probably have ignored the results. How come the official JXplorer GitHub repository (pegacat/jxplorer) had 39 stars while the next one (serkovs/jxplorer [Wayback Machine copy]) had twice as many? The difference was even more striking with subscribers of each repository (11 vs 66). What was also strange the serkovs/jxplorer was not even a clone of the official JXplorer repository and it only contained a single file - Linux installer for the JXplorer 3.3.1.2:
I downloaded Linux installer (32 bit ELF binary) from both repositories and compared the files. Just by looking and their sizes I knew they were different. The original Linux installer file jxplorer-3.3.1.2-linux-installer.run
(MD5: 0c00fd22c65932ba9ce58b4ba6107cf0
, VT) was 7679495 bytes long, while the one downloaded from serkovs/jxplorer (MD5: 0489493aeb26b6772bf3653aedf75d2a
, VT) was a bit larger (7954444 bytes).
Both files were generated by BitRock Install Builder, the same tool that was used to create Windows version of the installer. I knew the drill and immediately used bitrock-unpacker
to extract JXplorer software files and then compared them. There were no differences. Next I extracted BitRock installer files - again files were identical so I decided to further inspect the binary downloaded from the serkovs/jxplorer repository. While skimming through the binary in hex editor I noticed strings characteristic for the UPX packer however my attempt to unpack it with the upx
tool was unsuccessful and I got the not packed by UPX
error. After a while I realized that the file lacked usual UPX magic values (UPX!
) which were replaced by the following string: L1ma
. Fortunately upx
was able to unpack the file after I replaced all occurrences of L1ma
with the original value of UPX!
.
Once I had the unpacked file (MD5: 25c47cf531e913cb4a59b2237ab85963
, VT) I spent some time reverse-engineering it and eventually I found a suspicious function that started with decrypting 704 bytes of data (located at file offset 0x92040) using 256 bytes long XOR key (located at file offset 0x66700).
The decrypted data contained 15 null-terminated strings. The ultimate goal of the code was to establish persistence and to execute the following command:
1
|
|
The code followed two main paths, depending on privileges it was executed with. When ran with root privileges the code would perform following actions:
rpc-statd-sync
(with the following description: Sync NFS peers due to a restart
) to execute above one-liner~/.config/autostart/.desktop
) to execute above one-linerWithout root privileges the code resorted only to infecting current user.
While modified software was rather specific, at that stage I did not have any proof that the same entity was behind modification of both (Linux and Windows) JXplorer installers. I was also very curious what else I can find on GitHub.
I started going through GitHub accounts that starred or subscribed the repository serkovs/jxplorer and I quickly noticed patterns:
There were additional similarities among accounts that hosted repositories:
pobox[.]sk
, with username often corresponding to the one used on GitHub (sample commit message)I eventually ended up using GitHub API and Neo4j to collect and analyze metadata associated with suspicious accounts and repositories. Data showed nothing but a confined network of GitHub accounts starring and subscribing each others’ repositories.
As I was limited with time and resources and was not able to analyze each file in each identified repository I resorted to analyzing only a small subset of files. Two of the repositories turned out to contain interesting artifacts that allowed me to draw additional connections and fill existing gaps. Below graph shows “social interactions” between the serkovs account, two other accounts that I analyzed (mansiiqkal and ballory) and a number of related (starred/subscribed) repositories:
I decided to inspect content of the ballory/ffmpeg [Wayback Machine copy] repository because it did not contain JAR file(s) like most of other identified repositories - instead it had a bunch of Linux binaries, claiming to contain “FFmpeg Linux Build (64 bit)”. Additionally, the repository stood out as it did not have as many stars and subscribers as others (only 14) however the owner (ballory
) starred and subscribed at least 60 other repositories according to the collected data.
The readme.txt
file present in the repository directly linked to www.johnvansickle.com/ffmpeg/, a website hosting static ffmpeg builds for Linux. In fact, file names and directory structure matched sample build I downloaded from there. I did not find that exact build (ffmpeg-git-20180427-64bit-static.tar.xz
listed in the readme.txt
file) on www.johnvansickle.com so I was not able to compare files.
When I started analyzing the ffmpeg
64 bit ELF binary (MD5: c78ccfc45bfba703cce0fc0c75c0f6af
, VT) I immediately noticed suspicious code right at the entry point. The code was responsible for mapping the binary via /proc/self/exe
and then jumping to a specific offset, 624 bytes from the end of the file. After dumping and disassembling shellcode occupying last 624 bytes of the binary I was left with a short decryption loop (XOR 0x37, SUB 0x2e) and encrypted data. The decrypted data contained shellcode responsible for forking and executing following command in the child process via execve
syscall:
1
|
|
That was exactly what I was looking for. The allesare
SourceForge project was owned by the account named allare778
(Stein Sørnson), and this finding created plausible link between the GitHub user ballory
and that account.
Remaining part of the code was supposed to run in the parent process and was responsible for decrypting (XOR 0x11, SUB 0x31) 162 bytes of data located 786 bytes from the end of the file and jumping to it. The decrypted data seemed to contain original entry point function.
The other analyzed binaries from the repository (ffmpeg-10bit
(MD5: 6d5bea9bfe014fc737977e006692ebf3
, VT), ffprobe
(MD5: 98f8600ff072625fd8ff6b3e14675648
, VT), qt-faststart
(MD5: e9b58b1e173734b836ed4b74184c320b
, VT)) contained same pieces of shellcode, located at the same offsets from the end of files and used the same decryption routines. The only small differences were in the hardcoded offsets.
The second repository that yielded interesting results was mansiiqkal/easymodbustcp-udp-java [Wayback Machine copy]. The repository was starred and subscribed by both serkovs and ballory accounts. The description (Easy Modbus TCP/UDP/RTU
) and the file name (EasyModbusJava.jar
) suggested that it contained the EasyModbus Java library.
I downloaded the most recent version (2.8, released on 2017-03-14) of EasyModbusJava.jar
(MD5: 56668c3915a0aa621d7f07aa11f7c8a9
, VT) from the official EasyModbus project page and compared it with EasyModbusJava.jar
(MD5: 4d18388a9b351907be4a9f91785c9997
, VT) from mansiiqkal/easymodbustcp-udp-java.
There was no doubt about it, files were different. I used the zipinfo
to list archives’ files and metadata. The JAR from mansiiqkal/easymodbustcp-udp-java was a bit larger (97272 vs 114504 bytes), included one additional file (INumberOfConnectedClientsChangedDelegator1.class
) and according to timestamps was (re)packaged at 2018-03-22 18:29:58 (which in turn correlated with timestamp present in this Git commit message).
To be sure these were the only differences I used Jd-Gui to save decompiled Java classes from both JARs and then used WinMerge to see differences. Skipping negligible code formatting artifacts generated by the decompiler here is what I found:
de/re/easymodbus/server/INumberOfConnectedClientsChangedDelegator1.class
contained three large byte arrays and what seemed to be a decryption functionINumberOfConnectedClientsChangedDelegator1
classThe code present in the INumberOfConnectedClientsChangedDelegator1
class was designed to drop files to disk and establish persistence. The code used a custom decryption routine to decrypt an array of bytes and then used resulting blob (3011 bytes in total, MD5: cf2ca657816af534c07c8ceca167e25b
, VT) as a source of file content and strings (file names, system commands).
Depending on the operating system type the code was executed on, it performed different actions described below:
The code dropped a JAR file (MD5: 9d4aeb737179995a397d675f41e5f97f
) to $HOME/.local/share/bbauto
and created a desktop entry persistence by setting $HOME/.config/autostart/none.desktop
file to execute the following command:
1
|
|
The code also created an additional desktop entry $HOME/.config/autostart/.desktop
set it to execute the following command:
1
|
|
The code dropped a JAR file (MD5: 9d4aeb737179995a397d675f41e5f97f
) to $HOME/Library/LaunchAgents/AutoUpdater.dat
and established persistence by creating a launch agent called AutoUpdater
($HOME/Library/LaunchAgents/AutoUpdater.plist
).
The code also created an additional launch agent called SoftwareSync
set to execute the following command:
1
|
|
The code dropped a JAR file (MD5: 9d4aeb737179995a397d675f41e5f97f
) to %temp%\..\Microsoft\ExplorerSync.db
and established persistence by executing following command:
1
|
|
The dropped JAR file (MD5: 9d4aeb737179995a397d675f41e5f97f
) and Windows file and scheduled task names (ExplorerSync.db
, ExplorerSync
) were exactly the same as discovered in the modified JXplorer Tcl installer script. This created another plausible connection between the mansiiqkal/easymodbustcp-udp-java repository and modified Windows installer of JXplorer.
I also analyzed previous version of the EasyModbusJava.jar
(MD5: 38f51f6555eba1f559b04e1311deee35
, VT) file committed to the mansiiqkal/easymodbustcp-udp-java repository on 2018-02-20. It contained the same additional Java class however code was a bit different due to changes in an encrypted array and offsets referencing decrypted data. When decrypted the blob (3011 bytes long, MD5: 9a3936c820c88a16e22aaeb11b5ea0e7
, VT) contained mostly the same data as later version. The only notable difference was usage of %APPDATA%
instead of %TEMP%
as a base directory for location of dropped JAR file on a Windows systems.
By following breadcrumbs I was able to discover and draw connections between pieces of malware and online infrastructure:
The modified JXplorer Windows installer found on VirusTotal and modified EasyModbus Java library found on GitHub (mansiiqkal/easymodbustcp-udp-java) dropped the same JAR file (FEN downloader, MD5: 9d4aeb737179995a397d675f41e5f97f
). Further similarities were visible in the dropped file path (%TEMP%\..\Microsoft\ExplorerSync.db
) and scheduled task name (ExplorerSync
)
GitHub account mansiiqkal was part of the same “social circle” as other GitHub accounts: ballory and serkovs, among others. The accounts were linked by starring and subscribing to the same, confined set of GitHub repositories, including each other’s repositories
GitHub account ballory created the ballory/ffmpeg repository containing modified version of ffmpeg tools. Malicious code present in these tools was set to download a file from the following SourceForge project URL hxxp://allesare.sourceforge[.]net/
. The project was owned by an account named allare778
(Stein Sørnson). The same account owned another project named supremebot, hosting a sneaker bot with the same name (and described as “Supreme New York Bot”)
The supremebot.jar
file (MD5: 2098d71cd1504c8be229f1f8feaa878b
) hosted by the SourceForge supremebot project was also present in the steisn/blazebot GitHub repository belonging to the account steisn (Stein Sørnson). Additionally the YouTube account Stein Sørnson hosted a video about “Blaze Bot Supreme NYC”. Coincidentally, the malicious code present in the modified JXplorer Windows installer referenced “blazebot” and supremenewyork[.]com
GitHub account serkovs created the serkovs/jxplorer repository containing modified JXplorer Linux installer file. While the malicious code present in the binary did not reference any previously observed infrastructure both modified JXplorer installers (for Windows and Linux) could be connected by following linked GitHub accounts (see point 1.)
Let’s find out! Following up on specific indicators found in analyzed files and collected metadata about GitHub repositories I was able to discover additional related pieces of malicious code.
I started with VirusTotal hunting capabilities - the search returned a set of binaries belonging to the same malware family: Eimea Lite App. The functionality and supported commands of this malware seems to be closely tied with previously discussed FEimea Portable App. The main difference is that while FEimea Portable App is written in Java, the Eimea Lite App comes in the form of compiled binaries for both Windows and Linux operating systems. Each observed instance of Eimea Lite App was built into the LAME encoder tool, likely in order to thwart detection.
One of the oldest samples uploaded to VirusTotal on 2017-08-26 was (unsurprisingly) named supreme_bot2.cpl
(MD5: 815db0de2c6a610797c6735511eaaaf9
, VT). The sample uses two command and control servers: sanemarine.duckdns[.]org
, lemonade.freeddns[.]org
; contains two self signed certificates issued for Allesare Ltd.
and supports similar set of commands as Java based FEimea Portable App:
1
|
|
The most recent sample Aero.cpl
(MD5: dd3a38ee6b5b6340acd3bb8099f928a8
, VT) was uploaded to VirusTotal on 2018-11-25, which correlates with version string present in the file:
1 2 3 4 |
|
This instance uses the same command and control servers that were observed in initially analyzed sample of the FEimea Portable App (MD5: 65579b8ed47ca163fae2b3dffd8b4d5a
): limons.duckdns[.]org
and polarbear.freeddns[.]org
.
My other search focused on further exploration of the GitHub graph. I previously mentioned that suspicious GitHub accounts and repositories created a confined network - however the graph also included entries that seemed to be a bit off.
One of these entries was an account of Andrew Dunkins (adunkins [Wayback Machine copy]), that included a set of nine repositories, each hosting Linux cross compilation tools. Each repository was watched or starred by several already known suspicious accounts.
The account seemed to be legitimate at first sight - it included a profile picture and description, which was not consistent with previously discovered accounts. However a look at a sample ELF binary (i686-w64-mingw32-addr2line
, MD5: b54156221d1c5387b8de0eb4605dc3a0
, VT) hosted in one of the repositories quickly proved I was wrong. At the end of the binary there was a shellcode, almost identical to the one found in the ffmpeg binaries obtained from the ballory/ffmpeg repository. The only difference was that shellcode was set to execute the following command:
1
|
|
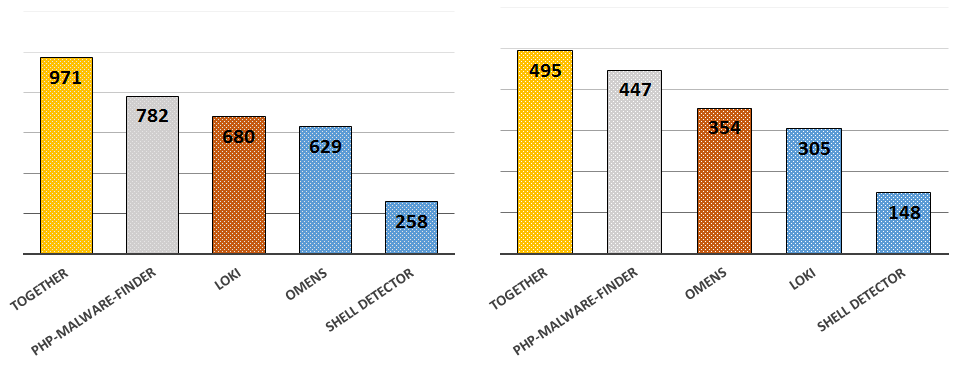
Overall there were 305 backdoored ELF binaries in nine GitHub repositories belonging to Andrew Dunkins.
Following that trail I found one additional account (snacknroll11) that starred some of Andrew Dunkins’ repositories and that contained a repository with interesting name and description (streettalk_priv_bot - Supreme Bot [Wayback Machine copy]).
Despite the name and description of the binary, the file included in that repository (supremebot.exe
) turned out to be something else - something that I have seen previously and something that provided a great closure for this post.
The file supremebot.exe
(MD5: 6ee28018e7d31aef0b4fd6940dff1d0a
, VT) was actually another modified version of JXplorer 3.3.1.2 installer for Windows. The installer also contained changed http-2.7.9.tm
file (MD5: 3a75c6b9b8452587b9e809aaaf2ee8c4
, VT) however some actions performed by the Tcl script were slightly different from the initially analyzed version:
hxxp://enl.duckdns[.]org
d7c4a1d4f75045a2a1e324ae5114ea17
, VT) to BR.jar
. The JAR file was another version of previously described JDL downloaderSo is this the end? I don’t think so :-)
Please note that GitHub has now removed identified accounts and repositories. Copies of the repositories showing their content are available via Wayback Machine. Where possible I included links to Wayback Machine copies in the above post.
]]>I opened the file in dnSpy and immediately encountered first obstacle - code was obfuscated with SmartAssembly. Fortunately, de4dot did all the dirty work for me and within seconds I was left with a compact code consisting of several classes. I quickly located main part of the program and realized that I am likely dealing with some kind of loader – part of the code was responsible for reading, decrypting and parsing data from two RT_RCDATA
resources.
After poking around a little bit more I found a method that was responsible for creating a new PowerShell runspace and executing PowerShell code retrieved from a previously decrypted resource. I was aware of the tools like p0wnedShell making use of exactly same method to “execute PowerShell code without running powershell.exe” so I thought that I am finally onto something.
At this stage, I just wanted to get my hands on a decrypted PowerShell code as fast as possible. Using CFF Explorer I exported RT_RCDATA
resource content to a file. Then I copied C# code responsible for decryption from dnSpy window and pasted it to LINQPad. I also needed to make a few small adjustments to the original code to read the content of the resource from a file and pass it to decryption function.
The code worked well but what I got back was not exactly what I expected. It was still a PowerShell code but it did not look like Invoke-Mimikatz or other offensive module that I knew of. Instead, I was looking at a rather ordinary script written by someone to manage software and patch installation on the workstations. All that effort for nothing? What a disappointment!
One last thing I wanted to figure out was the reason why someone made an effort to package a simple PowerShell script in this way. Was it a custom made packer? Or maybe the file was generated by some tool that I was not aware of?
I took a bunch of unique strings from the analyzed binary and fired up my favorite search engine. I quickly realized that analyzed binary was likely generated using SAPIEN Script Packager - available in products like PowerShell Studio or PrimalScript. Following this path I also found out that I was not the only one to encounter scripts packaged this way:
That’s all sorted out then, my investigation was over – or maybe not?
Judging by the fair amount of posts on the SAPIEN Forums their products seem to be quite popular among developers and administrators. Following my “failed” investigation I started wondering if they are also popular among malware creators? Let’s take a brief look at some of the SAPIEN Script Packager capabilities:
On top of that, the SAPIEN PrimalScript script packager supports many more “engines”, allowing users to package not only PowerShell scripts but also:
After learning about all these features I was almost sure that there must be some malicious PowerShell scripts packaged this way (spoiler: I was not wrong). I came up with this simple plan:
First step went smoothly thanks to Malware Hunting capabilities offered by VirusTotal. I initially created a really basic YARA rule for Retrohunt which resulted in approximately 230 samples and additionally gave me steady influx of 1-3 samples per day when applied to newly uploaded files.
1 2 3 4 5 6 7 8 |
|
The second step was when things started going south. While ExeToPosh worked really well for some of the collected samples it failed to extract data from the rest of the files. I did not want to reverse SAPIEN’s products (the license explicitly prohibits it anyway) so I ended up analyzing 20 or so samples. After several long evenings I knew exactly what was wrong. The files were generated by a different versions of Script Packager - and while mechanics did not change much between versions it was the small things that made a difference.
Here is what I learned about collected executables generated by SAPIEN’s Script Packager:
Up to four RT_RCDATA
binary resources were included in generated executables:
Majority of analyzed samples implemented two decryption schemes: AES and what was internally called “simple decode”. AES, however, seems to be available only in the “high encryption pack” and I have not seen any sample making any use of it
foobar
and hsdiafwiuera
(“configuration key” and “data key” respectively). Newer samples (starting around release of PowerShell Studio 5.4.138) used the following static key pair: 073E77D0D536421AA25BF60B16746B88
and BC373ACA27924EBEA29D2A22E348ACB4
In order to facilitate all of the above options and to speed up the analysis of several hundred samples I decided to create my own tool to statically analyze and extract embedded data. You can find the script on Github. It works well for samples that I have collected but taking into account the variety of Script Packager versions and packaging options it may fail miserably in certain situations.
After running all collected samples through my script I ended up with a log file containing more than one million lines of scripts (mostly PowerShell) and metadata.
When I started going through extracted data I was a little bit baffled - I expected to find relatively large number of malicious scripts (after all I sourced all samples from VirusTotal). Out of 250 analyzed samples only approximately 20% turned out to be malicious:
fontdrvhost.ps1
- a PowerShell downloader and management script for cryptocurrency miners (e.g. Hybrid Analysis, VirusTotal, extracted script). Interestingly majority of samples contained configuration (e.g. proxy servers) for specific AD domains. All collected samples used msupdate[.]info
for C2TrashPayloadMVEC.ps1
(VirusTotal, extracted script)LabTestHttp.ps1
(VirusTotal, extracted script)amazon_64.ps1
- set to communicate with 144.208.127.168:443
(Censys). It was one of the few observed samples that made use of execution restrictions - in this case only SYSTEM user was allowed to run the script (VirusTotal, extracted script)GardeRat.ps1
(VirusTotal, extracted script)192.10.22.35:443
(VirusTotal, extracted script)At the time of writing only packaged versions of fontdrvhost.ps1
had a decent amount of AV detections. Rest of the files listed above were ignored by majority of AV engines.
That would be it for malicious scripts. So what made remaining 80% of the extracted files - or rather what interesting data was included there? This part turned out to be a real treasure trove of this small research project. Let’s start with some statistics (based on approximately 210 non-malicious samples):
administrator
, fulladmin
or sccm_services
Another 30 extracted scripts included one or more secrets, for example:
net user
and Set-ADAccountPassword
including clear text passwordsoutlook.com
accountThe same amount of scripts exposed potentially sensitive data such as internal hostnames, URLs or usernames
Looking at above points it is clear that majority of these scripts were meant to remain internal to organizations in which they were developed. Unfortunately, the way how scripts are packaged does not seem to make things any better. I can see how a .NET binary obfuscated with SmartAssembly, containing IsDebuggerPresent
string and decrypting data from its resource section during runtime can end up with a generic detections by multiple AV engines. Then it is just a short path to situation when someone uploads such ‘flagged’ binary to VirusTotal or one of the many online sandboxes.
It seems to make perfect sense to start monitoring networks and endpoints for presence of executables generated by SAPIEN Script Packager - both for malware detection and prevention of leakage of potentially sensitive data. It is worth noting that there are also other tools that can be used to package PowerShell scripts in a similar way: ISESteroids, Posh2Exe, PowerShell Pro Tools PSPack.exe.
]]>Warning: Spoilers ahead! If you did not take the challenge yet, consider going back and trying to solve it by yourself!
To my big surprise my write-up was awarded first place. @TekDefense posted it in this blog post. Make sure to also check out @CYINT_dude’s write-up which took second place. With all that I decided to write a short follow-up, presenting how I performed my analysis and how I came to final conclusions.
Before we start please remember that:
First things first. Let’s go briefly through tools I used to analyze the PCAP, develop detection rules, create a timeline and final report:
In addition to above-mentioned, I used a locked-down virtual machine running Kali Linux to execute suspicious ELF binaries.
It is also important to mention online resources and OSINT tools that were crucial for me to get additional context or better understanding of files, malware and indicators I encountered during investigation:
Having all of my tools of trade handy I decided to load the PCAP into Wireshark and start from there. As the provided Snort signature was simple and only looked for two strings it was easy to find matching packets without a need to use Snort:
1
|
|
Wireshark found 13 matching packets, each belonging to different TCP session (based on different destination ports). The Snort signature seemed to be looking for the server version and part of HTTP cookie headers set by the server in HTTP response:
Quick Google search revealed that strings in HTTP headers are characteristic to HTTP File Server (HFS) - a server designed for file sharing. According to provided challenge scenario it was a Snort hit that alerted customer about (potentially) suspicious activity.
I started wondering why file transfer from a server running specific software (HFS) could be a (potential) indicator of compromise? Well, it did not take long until I came across articles from Antiy and MalwareMustDie describing how vulnerable HFS servers were being exploited in order to serve malware.
At this point I assumed that the server 104.236.210.97 belonged to the client and was a target of malicious activity.
As the provided PCAP file was roughly 56 megabytes I felt like I need to get a better understanding of what kind of traffic was actually captured there.
With the help of several tshark filters presented below I obtained some basic stats on network protocols, sessions and ports present in the PCAP. My initial goal was to at least skim through traffic for top protocols and sessions and look for anything suspicious. Just a brief look showed large number of SSH sessions and UDP packets destined to port 80 which seemed to be a little bit off, warranting further analysis.
1 2 3 4 5 6 7 8 9 10 11 |
|
1 2 3 4 5 6 7 |
|
1 2 3 4 5 6 7 8 9 10 11 |
|
With such amount of traffic I needed a good way to document and represent network connection data in order to be able to correlate all suspicious events. I decided to use tshark to export important information to CSV files and then import them to Excel. This seemed to be the quickest and simplest way to organize the data I needed.
I started with HTTP and used following two commands to extract needed HTTP request and response data from the PCAP:
1
|
|
1
|
|
It was not that hard to correlate and combine both outputs. As you can expect number of HTTP requests roughly matched number of HTTP responses so it was just a matter of a single copy and paste operation to get them together in a single Excel worksheet. As a result each entry in my timeline contained fields extracted from both HTTP requests and responses making it much more readable (at least for me!).
Having my HTTP timeline ready I started reviewing and marking entries with colors. At that point I still did not have a good understanding of intrusion but as some entries seemed to be more suspicious than others it was a good way to mark them for follow up.
Throughout my analysis I used three different colors to visually expose entries:
After looking at collected HTTP entries I concluded that:
As I was going through subsequent flows I started adding information about different IP addresses in a separate tab - just to have a handy source of reference.
Extracting files from the PCAP was not a particularly hard task. As all transfers I spotted were using HTTP I just used Wireshark’s Export Objects option:
I quickly got rid of irrelevant HTML files as most of them just represented 404 (e.g. testproxy.php) or 302 (e.g. from mirrors.digitalocean.com) HTTP responses. Just by looking at file names and their sources I had suspicions which ones will turn out to be malicious. I did not bother investigating any of .deb files as they all came from legitimate source. I also assumed that in-depth analysis of every file was not a goal of the challenge - though I still wanted to extract all relevant network and endpoint indicators. Due to lack of time I decided to rely on basic static analysis, OSINT research and only when needed - dynamic analysis.
In the first place I gathered MD5s of files of interest and used Automater to quickly query VirusTotal:
Except for the file or.bin (09b62916547477cc44121e39e1d6cc26), all queried files had detections from multiple AV products. I combined CSV output from the Automater to yet another tab in my timeline spreadsheet. I also added size, type and architecture (based on file output) columns:
Below are my notes for the BillGates binaries and the or.bin script as I found them most relevant and interesting. I’m going to skip descriptions of other extracted files like nc.exe (Netcat) or back.pl (reverse shell Perl script) as cursory analysis immediately reveals what they are.
My goal here was just to confirm that all files detected as BillGates malware were in fact malicious. I also wanted to know how does network traffic generated by each ELF executable look like. I thought that identifying such traffic in the PCAP could give me new interesting leads.
After reading several awesome write-ups on BillGates from Akamai, MalwareMustDie and Novetta I knew what to look for in collected files.
Thankfully all files were not stripped so simply running strings on them revealed some interesting details. I also noticed that all ELF files were exactly 1223123 bytes long - it was yet another indicator that they belong to BillGates malware family.
1 2 3 4 5 6 |
|
All ELF files contained references to source code files that were almost identical to ones identified by Novetta and MalwareMustDie in their reports.
1 2 3 4 5 6 7 8 9 10 11 12 13 14 15 16 17 18 19 20 21 22 23 24 25 26 27 28 29 30 31 32 33 34 35 36 37 38 39 40 41 42 43 44 |
|
The last file (a91261551c31a5d9eec87a8435d5d337) was a PE binary. DrWeb’s detection on VirusTotal claimed that it was BackDoor.Gates.8. I was not aware about Windows versions of BillGates malware but Stormshield’s blog post quickly got me back on the right track.
As described by Stormshield, the file contained multiple embedded PE binaries inside its resources section:
1 2 3 4 5 6 7 8 |
|
At that point I was confident that I can identify all these files as belonging to BillGates malware family in my report. The last thing I needed were network indicators.
I followed the below process for ELF files in order to obtain C&C address, protocols, and ports used for C&C communications:
Below is sample analysis for the SYN binary (cd291abe2f5f9bc9bc63a189a68cac82
):
1 2 3 4 5 6 7 8 9 10 11 12 13 |
|
The process for Windows version of malware (a91261551c31a5d9eec87a8435d5d337
) was much simpler as I just needed to execute it in my Windows VM and observe FakeNet’s output.
Next I updated my Excel spreadsheet with collected network indicators and proceeded to the next extracted file.
or.bin was an interesting file. Beginning of the file contained simple Bash script that read and extracted a tar.gz archive appended to the end of the script. When extracted it just started install binary:
1 2 3 4 5 6 7 8 9 10 11 12 |
|
The install file seemed to be a stripped 64-bit ELF binary. Interestingly, the archive contained also a file named ooz.tgz which was not a tar.gz archive as suggested by its extension. The file contained very specific header “Salted__” indicating that it was encrypted using OpenSSL.
1 2 3 4 5 6 7 8 9 10 11 |
|
It looked like I would need to analyze the install file to learn how to decrypt ooz.tgz. Unfortunately, after initial inspection I knew that it will not be that easy. Binary seemed to implement several anti-analysis techniques. All strings in the binary were obfuscated:
Basic anti-debugging was implemented by making one of the child processes attach to the main process using a ptrace() call, effectively preventing use of debuggers and tools like strace:
1 2 3 4 5 6 7 8 9 10 11 12 13 14 15 16 17 18 19 |
|
When I placed the file in a separate directory (so it did not ‘see’ ooz.tgz) and executed it, I noticed some strange output - like it was trying to spawn system commands:
1 2 3 4 5 6 7 8 9 10 11 12 13 14 15 16 17 |
|
If my suspicion was correct, the program was deobfuscating strings during runtime and then passing them as arguments to execvp() function (which was visible when I opened the binary in IDA). I needed a way to get insight into what exactly is passed to execvp() calls without actually attaching debugger to the process.
After short research I found snoopy which seemed to do exactly what I needed. After enabling Snoopy and running install binary again I found following entries in a log file:
1 2 3 4 5 6 7 8 9 10 11 12 13 14 15 16 17 18 19 20 21 22 23 24 25 26 27 |
|
Bingo! It looked like the binary was decrypting ooz.tgz file with the DES3 key buWwe9ei2fiNIewOhiuDi
, decompressing the archive and then compiling OpenSSL and OpenSSH from resulting source code. That definitely looked suspicious!
1 2 3 4 5 |
|
The decrypted file contained yet another archive jack.tgz which in turn contained source code archives for OpenSSL, OpenSSH and zlib.
1 2 3 4 5 6 |
|
I assumed that the final goal of the install binary was to install a modified version of OpenSSH and proceeded to closer inspection of the OpenSSH archive.
The great thing about tar archives is that by default they preserve some metadata about the archived files, including file ownership and modification timestamp. I skimmed through output of ls -lR command and it did not took long to notice that small part of the files from the extracted archive openssh-5.9p1.tgz had different owner (root) and much later modification time than the rest:
1 2 3 4 5 6 7 8 9 10 11 12 |
|
As far as I could tell all modifications were consistent with OpenSSH backdooring article presented in this e-zine.
1 2 3 4 5 6 |
|
I stopped analysis of the or.bin file at this stage. With the new lead I kept a mental note to check the PCAP for (suspicious) SSH connections later on.
My primary goal here was to check if PCAP contained any DNS queries for malware C&C domains identified earlier. I thought it would be a good indicator that malware was executed on a compromised server. Instead of checking each domain one by one I decided to export all DNS queries and responses from the PCAP and add them to my spreadsheet:
1
|
|
I was not really surprised when I saw that first DNS query recorded in the PCAP was for one of known domains top.t7ux.com:
As I was able to easily filter my results I immediately knew that the domain resolved to two different IP addresses:
I noted the following timestamp: 2016-09-07 22:19:03Z as an approximate time when malware was executed on a compromised system. I did not have any hard proofs but it was a good start.
I also briefly reviewed other DNS queries sent by the compromised server, but I did not find anything else worth digging in. There was just this one strange query sent at 2016-09-07 23:53:44Z:
Was it possibly an attacker and his fat fingers mistyping something like host
Getting actual C&C traffic was easy as I already knew IP addresses, protocols and ports used by malware. I decided to export each C&C packet to be able to see any changes in beaconing pattern. Initially I filtered out all retransmitted packets for better visibility.
I used the following tshark options to export all C&C traffic to a CSV file:
1
|
|
When I was analyzing the beaconing pattern, I noticed that for the first ~12 hours malware sent 45 identical messages, each approximately 15 minutes apart from the previous one. Based on Akamai’s write-up I was able to extract following information from captured messages:
There were no responses from any of C&C servers until 2016-09-09 13:46:05Z when 222.174.168.234 sent 18 messages containing following data 0400000000000000
in one second intervals.
But here is the problem - only by accident I noticed that there was some additional data exchanged between compromised system and C&C that I missed due to display filter I used to export data with tshark. Wireshark also did not show that data in the “Follow TCP Stream” windows as it was not able to correctly reconstruct entire conversation.
The exchanged data turned out be be crucial for further investigation. For every 0400000000000000
message sent by C&C there was a response packet from the compromised host containing what looked like an IP address:
This message exchange resembled what @unixfreakjp named “3rd step” in his post on KernelMode.info. Nowhere in the PCAP did I find initial two steps of communication between compromised host and C&C (222.174.168.234).
Yet again I referenced Akamai’s write-up and I noticed that responses sent by compromised host to some degree mirrored initial command message sent by C&C (which was missing in the provided PCAP). Based on their analysis it looked like in this case the malware was instructed to perform a DoS attack against IP address 23.83.106.115 over UDP (value 0x20) port 80 (0x50). Nice, one more lead to check!
I jumped straight into checking if any suspicious UDP traffic was present in the provided packet capture. I used Wireshark and its “Statistics -> Conversations” menu:
32038 UDP packets on port 80 sent from 104.236.210.97 towards 23.83.106.115? Well, that was kind of… expected (I also recalled 32082 QUIC packets listed by tshark in the Protocol summary. As the rest of UDP conversations seemed pretty standard I simply exported all metadata about UDP packets sent to the attacked host:
1
|
|
The amount of packets and short interval between them was telling. Compromised host transferred approximately 32 megabytes of data in just half a second. All packets were sourced from UDP port 55198 and were between 965 and 989 bytes long (minus static 8 byte UDP header).
Although at this stage I had good overview of what happened, I was still missing one important piece of the puzzle - initial infection vector. Based on couple of writeups I knew that actors behind the BillGates botnets very often compromise Linux machines by using SSH and brute forcing root password.
Using my standard ‘per-packet’ tshark export format was not of much help in this case as I wanted to know length of each session and amount of exchanged data. My initial assumption was that by looking only at these values I’ll be able to tell which SSH session was successful (as in: user provided correct username and password and was granted access to console) and which was not (e.g. it was a failed brute-force attempt). I needed to know if there was any successful session established just before suspicious events started occurring on the compromised host or if there were any brute-force attempts.
I quickly tested two scenarios where I connected to my VPS over SSH and captured traffic for both successful logon and failed attempts (3 seems to be a default setting for OpenSSH). Getting a command line prompt needed approximately 8500 bytes to be exchanged between SSH client and server (in ~24 packets). Three consecutive (failed) login attempts generated approximately 6700 bytes (in ~26 packets). These were of course rough estimates and likely were dependent on specific configuration but at least they gave me some idea. I assumed that every SSH conversation with higher number of exchanged data and frames would be indicative of successful user login over SSH protocol.
I used the following command to list all TCP conversations in the challenge PCAP and then filtered out all that were not over port 22:
1 2 3 4 5 6 7 8 9 10 11 |
|
Based on lengths of sessions and amount of exchanged data I selected two SSH clients: 46.101.128.129 and 71.171.119.98. In case of 46.101.128.129 both SSH sessions started just before first HFS file download occurred (at 2016-09-07 22:16:16Z). Taking into account timing and lack of any other suspicious connections I assumed it was the attacker that successfully authenticated to the compromised host over SSH. My suspicion was that the initial session was a successful brute-force attempt, while the second session was used to deploy malware and adjust compromised host to attacker’s needs. Looking at short time between both sessions and also between subsequent events it was evident that whole process was at least semi-automated. As a side note I need to say that I would restrain from formulating such far-reaching conclusion if it was a real life scenario and I would definitely try to obtain additional evidence!
The PCAP did not contain initial handshake for SSH connection from the IP address 71.171.119.98 and thus I was not able to tell when the session has started (prior or after attacker’s activity) and if the session was much longer than 16 seconds reported by Wireshark.
Rest of the SSH connections seemed to be unsuccessful brute force attempts. Most of them were characterized by the use of the libssh library by clients (visible in the initial SSH message from the client), short duration and low number of exchanged data.
Having all the data and findings handy it was just a matter of drafting a final report with answers to challenge questions. As a final step I proceeded with creating a master timeline as a an ultimate source of reference. Not having much time left I did not bother with proper formatting or using any template - I simply thrown all entries into a new Excel sheet and sorted them by timestamp. The story of a breach was immediately apparent:
That is it! As mentioned in the beginning, the final write-up was posted by @TekDefense on his blog. You can also find timeline spreadsheet here.
]]>We are back again with webshell topic as last blog post was warmly welcomed by our readers. At the beginning, I would like to say - sorry for the delay! We received a few messages asking for a continuation of this series. So, here we are, even such a long time in the IT world did not devalue our subject which seems to be still hot, referring to latest web trends or social media discussion. In this blog post I decided to perform more structured tests of several publicly available webshell detection tools.
Some time ago Recorded Future published a great writeup on webshells. Two key takeaways were points discussing high popularity of webshells amongst Chinese criminals and continual development of new samples. It came as no surprise that a large number of samples in my data set seemed to be of Chinese origin.
I used the following, well known webshell repositories to create my own, testing superset:
A few comments are needed here. First three repos are a great collection of webshells, mostly written in PHP. I needed to clean-up the tennc repository a little bit by eliminating webshells that I was not interested in, and removing unrelated files like images, readme files etc. Stuff from irongeek.com was something that I found accidentally but I really liked it and decided to include five most recently added files in this research. Weevely (version 3.4) is a well-known webshell generation framework, that is also part of Kali Linux. As webshell agent code is polymorphic, I decided to generate fifty different samples to ensure good test coverage. Last, but not least, htshells had its own 15 minutes of fame about 3-4 years ago, although old-fashioned, it is still relevant nowadays. Just think, when was the last time you saw AllowOverride ALL
? There are still many admins looking for advice how to turn it on. Thanks Tomi for bringing this to my attention!
Moving forward, when I was collecting samples I focused on specific file formats - the ones that are most popular and prevalent in the wild - ASP.net, JSP, PHP. Some of the files had .TXT extension or contained webshell code disguised as a JPG or GIF file. Moreover, I did not remove ColdFusion webshells. For shits and giggles, I left it as a non-popular type of webshell to see how tools would react. Some of them still can be spotted in the wild from time to time (1,2).
Overall size of entire collection was more than 1k files. Due to overlaps I needed to deduplicate some files by comparing their hashes, so please relax - no fail here:)
The overall detection rate was a primary objective for this test. This coefficient was a simple ratio of detected webshells against entire collection. Webshell detection variety (obfuscated/not obfuscated, programming languages, miscellaneous formats) was a second factor. Next on the list was a false positive ratio and final factor of this test - speed. For tools running under Linux/*nix, I used time command in order to measure the elapsed time. Speed was only measured for scenarios where full data set was used. Exception was OMENS which is a Windows tool, so it was tested on a different VM.
All above factors were a criteria for tools evaluation. Of course, I am aware that each tool is different and works in a distinct manner, but in the end all of them have the same objective - detect webshells. And that is exactly what was tested. I wanted to find the best tool in two categories: Overall detection with the smallest false positive ratio Overall PHP webshell detection with the smallest false positive ratio
At this point it is necessary to mention that for some tools documentation indicated that only specific file formats are supported. As a result I needed to create multiple tailored subsets of my initial data set. PHP webshells are the most popular type based on formats nowadays, hence majority of the webshell detection tools supports it. That is a reason for me to test how successful tools are on that field.
All tools were tested in the exact same way. Data sets were uploaded to server and then each tool was fired against them with default ruleset in the following scenarios:
NOTE: “valid files” represents the same collection of random files used in part 3.
Without a further ado, I hope all is clear now and we can start reviewing test results!
I started with our old friend, Shell Detector. As you may remember, last time it was not our contest winner, but I wanted to test it as it is still being mentioned in many webshell detection writeups.
Shell Detector marks files as suspicious and webshells - it is worth to mention that webshells are also marked as suspicious files (double tag)! I focused only on webshells tag - suspicious was too wide (many false positives) as it was presented last time.
And what were the results? Only 1 out of every 5 files was recognized. Even if I tested only PHP/ASP files, it stayed on the same level of detection. The execution time of a process also was not satisfying - 5 minutes and 16 seconds.
Second tool in our test should be also familiar to you. LOKI did very well in the previous part of this series and I expected good results also this time. Not wasting your precious time, let’s jump to test results:
Honestly, I was surprised that it did not perform so well as I expected. Detection ratio around 60% is NOT a bad score but I was hoping for a much better results based on the previous test. Not this time. Please remember that I only used default rulesets provided by each tool.
Analysis of the results gave me a few interesting observations. First of all, LOKI did not detect htshells. The absence of detection of these webshells was caused by lack of relevant rules. The situation was a little bit different for Weevely backdoor agents. None of the fifty agents were detected despite the existence of a dedicated rule in the thor-webshell.yar ruleset. I must mention here that this rule was created back in 2014 and it’s no longer applicable to Weevely 3.x PHP agents (it works just fine for older versions, e.g. 1.1). Additionally, it had a problem with the PHP files from the caidao-shell repository which includes different types of China Chopper webshells and clients. Last but not least, I observed that LOKI had problems with obfuscated files. It was easily observed in results for PHP-backdoors repository where I noticed only a few hits.
Another part of tests was a false positive ratio. Once again I can say that LOKI was able to overcome this challenge. I tested it twice with two different groups of valid files, both attempts were successful as I did not get any false positives.
Execution time - 39 seconds - was the best out of all tested tools.
And now, I would like to warmly welcome a newcomer to our series - PHP-malware-finder! I learned about it from its authors on Twitter - thank you very much!
@dfir_it Hello! We read your articles about Webshell and wondered if you would like to test our detection tool: https://t.co/xCM57EiRGx
— nbs_system (@nbs_system) August 23, 2016
It goes without saying, I was happy to test it. Although, before I move to test results I would like to briefly introduce you to this tool. From Github page:
Detection is performed by crawling the filesystem and testing files against a set of YARA rules. Yes, it’s that simple!.
YARA plus effective rules sounded like a good recipe for decent results in our tests. In addition, authors mentioned a few features which can increase detection of obfuscated files. It all gave me hope for a high percentage of detection.
How does it look like when executed? The user is presented with a simple output without too many details explaining reason for detection - just short information which YARA rules fired (eg. DodgyPhp) or if file was suspiciously short (TooShort):
1 2 3 4 5 6 7 8 9 10 11 |
|
I noticed a few things that might be noteworthy:
1 2 |
|
Let’s move on to our test and check the PHP-malware-finder!
As you can observe, PHP-malware-finder(PMF) achieved better results than LOKI. I need to mention here that to perform full test with PMF I had to execute it twice and select language (-l switch) to either PHP or ASP. The reason for that was the way PMF process rules. When used with -l switch, tool process suspected file with php.yar or asp.yar respectively. First rule in both files is a global private rule and checks whether the file format is compatible with the user choice. If not, processing of the file stops at this point, it is because of the way how global rules work. Ultimately, I merged the outputs to receive final result.
Regarding the result from PHP testset, I was super glad - big WOW! Almost 80% looked really good. There was space for improvement, but that was something I considered as a really promising foundation for further development. Much better than LOKI with default YARA ruleset. One more thing was false positive rate level. It was extremely low and could be tolerant in production.
I expected execution time to be close to LOKI as detection methods of both tools are similar. As it sometimes happens, reality does not always meet expectations. PHP-malware-finder, when executed without any additional switches, needed 1 minute and 41 seconds to complete the scan
Next debut here! Yet again I learned about this tool from Twitter (I love social media!).
@lennyzeltser @maridegrazia @dfir_it if you get a chance checkout *OMENS*. I'm kinda partial to it ;)https://t.co/dMlbWYyPei
— Quix0te (@OMENScan) July 8, 2016
Of course, I tested it with pleasure!
OMENS is free and closed source. Author explains reason for this decision. Even though I am personally a fan of open source tools, I can think of various reasons for making such choice and I respect that. For more information about this tool I recommend you to read official documentation.
I am happy to see a dedicated tool for Windows OS, as most of the available tools focus on *nix systems. Output looks pretty nice. It contains detailed information about each hit, including full path to an affected file plus information which files were added since the last scan. Below is a sample output:
1 2 3 4 5 6 7 8 9 10 |
|
Another handy feature allows to generate a result file named BadHTML.log. It lists all files marked as suspicious and can be easily used as input to other programs/devices for further analysis or to block traffic.
Final results from test:
Detection ratio from all sources was similar to YARA based tools - 56%. Problem appeared with high false positive rates - more than 8%. Documentation doesn’t provide any information about limitation of supported file formats, so high FPs ratio likely was not an effect of badly composed testing set. Unfortunately, this feature can cause a lot of hassle for people tasked with reviewing alerts. According to our goals, I performed one additional test with only PHP files:
The results were similar to first test. Good detection rate but high level of false positives - 9,52%. In my opinion it is not feasible to maintain a production tool with so high false positive ratio. I would recommend this tool if it was possible to easily edit signatures which would allow me to tuning these generating a large amount of FPs and creating new ones to enhance the level of detection. Unfortunately, OMENS in its current shape does not allow these kind of changes.
As it was told at the beginning of this post, I did not test speed of scanning for that tool.
The subtitle of this part is not accidental. (I named it after Jack Johnson’s song). Right after my tests were completed, I started thinking how to improve overall detection score to be higher than 90%. Two projects use YARA so naturally, I decided to combine databases of both tools and see if it is going to help.
At the beginning, I compared test results from both tools to see how many detected webshells were not visible by another. The output files from LOKI and PHP-malware-finder were formatted to contain only sorted full paths of matched files. Next I searched for the differences between two files:
1 2 |
|
As soon as I saw result that operation I just wanted to leave for my favourite bar and get a glass of something good. You may asked me why I was so happy. Short answer to that question is a very long list of differences between both files. When I merged the results I got 82.2% detection rate (910 webshells detected). Huge improvement achieved. It was not perfect but it still left me with some tricks up my sleeve to increase the overall ratio by adding new YARA rules.
Let’s put it all together in one tool. I decided to use LOKI mostly because of scanning speed and logging enabled by default. I copied .yar
files to LOKI’s signature-base/yara/
directory and started testing. As you can imagine it is never that simple. Story of my life. It was not different this time. Both tools use YARA but are build in a different way so there were a few changes that I needed to apply:
$chmod = /chmod\s*(.*777)/
And now is the best part, after resolving problems from above list, our detection ratio increased! 968 shells and 87.44% accuracy achieved by LOKI. I tested also PHP-malware-finder with last two changes and I noticed much better results than before:
These results were really good, but still it was not our last word!
Do you remember a ruleset with modification from last part of this series ? Yes, now it was the time to play that card. I did not expect too much, because actual detection ratio was high, but I was not disappointed and I got another three matches, so at that point I had 971 findings (495 findings for PHP files - 88.39%).
Naturally, main question came to my mind: “What files are still not cover ?!”
Time to answer that question. I had a list of 136 files not detected. Statistical analysis of the results based on formats showed that most undetected extension was PHP - 65 matches, but it worth to mention that if we consider proportion of tested files to undetected files also based on format then ASP will be on first place - 43 out of 141 files, gives 30,5% undetected ratio. Moreover, TXT files (7 matches in total - 3 PHP, 2 ASP and 2 JSP content inside), one example of ColdFusion and htaccess shell (I was positively surprised!) were still undetected. Additionally, I examined relation between obfuscated and non-obfuscated PHP files (including three hiding behind TXT extension) from collection of undetected files. The graph below present the results:
A little deeper look at results gave me a few observations what was not detected. Take a closer look at details:
I would like to go into more details but it is material for different article where I could analyse step by step why these files were undetectable. However, I hope that all above analysis will be a good source for developers tested tools.
One sentence to sum up all the above. Do not give up, my blue team friends! Though none of the tested tools achieved 100% success rate, everybody knows and agrees that detection tools cannot be the only layer in your defence strategy. It is something, I have touched upon in the last part of this series. Even though, in this post I have highlighted limitations and weaknesses of some tools, my hope is to not discourage anyone from developing and improving community toolset. It is a continual process and learning from each other hopefully helps to make the difference, at the end of the day. Positive result of this research is the fact that by sharing experience and combining work of people from different companies, backgrounds and projects, we can bring tangible benefits to all of us.
Gold medal goes to COOPERATION! As always - keep fighting! Keep defending!
PS. If you write YARA rules for your own use, consider sharing with community and submit them to YaraRules Project.
]]>I have evaluated the following projects focusing on webshells detection:
These tools were tested against the files presented in part 1 with addition of a few new ones:
The conducted tests verified the detection accuracy of all tools when faced with a combination of different webshells mixed with hundreds of valid files from GitHub repositories and other public sources:
At first, I tested NeoPI. According to project’s GitHub page, NeoPI is a Python script that uses a variety of statistical methods to detect obfuscated and encrypted content. Below output presents result of running a tool against a set of aforementioned files:
[[ Total files scanned: 4323 ]]
[[ Total files ignored: 0 ]]
[[ Scan Time: 16.773207 seconds ]]
[[ Average IC for Search ]]
0.0762022597838
[[ Top 10 lowest IC files ]]
0.0153 ../webshell_db_short/myluph.php<
0.0168 ../webshell_db_short/vero.txt
0.0202 ../webshell_db_short/unknownPHP.php
0.0248 ../webshell_db_short/phpcollection/2.php
0.0262 ../webshell_db_short/myluphdecoded.php
0.0268 ../webshell_db_short/phpcollection/wkv3.php
0.0270 ../webshell_db_short/china.aspx
0.0284 ../webshell_db_short/phpcollection/agenda.ics.php
0.0285 ../webshell_db_short/phpcollection/config.xml.php
0.0289 ../webshell_db_short/phpcollection/uploads.php
[[ Top 10 entropic files for a given search ]]
6.2409 ../webshell_db_short/phpcollection/phpmailer.lang-zh.php
6.2355 ../webshell_db_short/phpcollection/phpmailer.lang-zh_cn.php
6.1932 ../webshell_db_short/unknownPHP.php
6.1622 ../webshell_db_short/phpcollection/phpmailer.lang-ch.php
6.0307 ../webshell_db_short/vero.txt
6.0258 ../webshell_db_short/myluph.php
6.0151 ../webshell_db_short/phpcollection/phpmailer.lang-ko.php
5.9169 ../webshell_db_short/phpcollection/phpmailer.lang-ja.php
5.7736 ../webshell_db_short/phpcollection/1.php
5.7393 ../webshell_db_short/phpcollection/phpmailer.lang-vi.php
[[ Top 10 longest word files ]]
554750 ../webshell_db_short/phpcollection/wkv3.php
11999 ../webshell_db_short/phpcollection/full_dump.php
11999 ../webshell_db_short/phpcollection/contentobjects.php
1774 ../webshell_db_short/myluph.php
660 ../webshell_db_short/vero.txt
641 ../webshell_db_short/c99shell.php
547 ../webshell_db_short/phpcollection/EmailAddressValidator.php
356 ../webshell_db_short/phpcollection/priv.txt
197 ../webshell_db_short/phpcollection/emission.xml (2).php
197 ../webshell_db_short/phpcollection/emission.xml.php
[[ Top 10 signature match counts ]]
85 ../webshell_db_short/c99shell.php
35 ../webshell_db_short/phpcollection/run-tests.php
27 ../webshell_db_short/phpcollection/WikiComments.aspx
24 ../webshell_db_short/phpcollection/MemberSearch.aspx
22 ../webshell_db_short/phpcollection/CustomPageManagement.aspx
22 ../webshell_db_short/phpcollection/Comments.aspx
20 ../webshell_db_short/phpcollection/phpmailerTest.php
20 ../webshell_db_short/phpcollection/ManageTerms.aspx
20 ../webshell_db_short/phpcollection/TimestampIntegrationTest.php
17 ../webshell_db_short/byroe.jpg
[[ Top cumulative ranked files ]]
56 ../webshell_db_short/myluph.php
57 ../webshell_db_short/vero.txt
176 ../webshell_db_short/c99shell.php
219 ../webshell_db_short/phpcollection/wkv3.php
225 ../webshell_db_short/phpcollection/1.php
372 ../webshell_db_short/myluphdecoded.php
444 ../webshell_db_short/phpcollection/profile.php
525 ../webshell_db_short/phpcollection/WikiComments.aspx
570 ../webshell_db_short/phpcollection/uploadpostattachment.aspx
595 ../webshell_db_short/phpcollection/Fields.aspx
Pros:
Cons:
I’ve noticed it would be really helpful to combine summary information about a files detected by more than one heuristic. For instance in my test byroe.jpg was visible in top ten signature matches, longest word and entropy but not in Top cumulative ranked files.
Taking into account that NeoPI wasn’t updated for last 4 years, didn’t detect all types of webshells, generated number of false negatives, it still had quite impressive detection rates of a relatively new webshell samples. I can recommend adding NeoIP to webshell analysis toolbox. InfoSec Institute has a nice write-up on NeoIP with some additional details.
Shell Detector was a second tool that I have evaluated. I really liked how the results were presented in console:
There is also a web version available here.
Pros:
Cons:
To sum up even though the signature database file appears to be out of date the tool correctly determined almost all files to be malicious. This tool can provide powerful detection capability as long as signature database is kept up to date.
LOKI presents scan results in a terminal, coloring entries depending on their severity. It also outputs all matches to a single log file. The rules are written in YARA, easy to use yet very powerful language to identify and classify malware which appears to be a tool of choice by the security industry. According to project’s website most effective rules were borrowed from the rule sets of his bigger brother THOR APT Scanner. For me, the most interesting were the ones dedicated to webshells detection.
My first scan of a sample set with a default signature database showed moderate detection ratio (5/9). With YARA growing popularity among infosec world, it’s possible to build and maintain a powerful database to hunt malware including webshells and research new obfuscation techniques and variants observed in the wild. Taking that into account, I decided to improve the results obtained previously. I found set of rules, that almost perfectly match my expectation. After a quick adjustment, final score was close to ideal - ratio (8/9). It were really a tiny changes, so I’ll shortly describe it:
After all of that, as a result I received the biggest advantage of LOKI - false positive number was zero!
Pros:
Cons:
To sum up the results from all the tools, it’s really hard task to develop one tool which will mark with good accuracy webshells as suspicious. It’s because there is a wide range of different functions, methods, encodings which would be use to achieve the same effect. Attackers don’t need to use base64_decode function to decode their base64 code. Instead, they can add their own proprietary function to do exactly that. They can use a string lookup array to avoid keyword-based detection or invoke function names by string with str_replace and much more. Imperva did a great research describing various teqchniques in their blog post.
The only webshell not detected by LOKI was unknownPHP.php which obfuscation technique is really advanced - thanks to Darryl from Kahu Security, you can follow the decoding process in a great post. As its not possible to detect it using general signature rules, NeoPI methods (entropy, Index of Coincidence) are an excellent solution for this kind of backdoors. Together with LOKI, it seems to be a powerful weapon to detect webshells.
There are a few things that can be done to protect organizations against a server compromises:
When #ThreatHunting try and define a narrow scope of what you are looking for. I have a thing for webshells lately so… #DFIR 1/8
— Jack Crook (@jackcr) May 10, 2016
Look at processes that are spawned by the owner of the webserver process #DFIR 4/8
— Jack Crook (@jackcr) May 10, 2016
Look at POST requests with no referrer and a 200 response code #DFIR 5/8
— Jack Crook (@jackcr) May 10, 2016
Look for POST requests to new directory paths and filenames with a 200 response code #DFIR 6/8
— Jack Crook (@jackcr) May 10, 2016
Community also has its own ideas:
@jackcr baseline the web server/ app error logs. Focus on exceptions about previously not seen file names e.g -> https://t.co/gIOFcE6wgI
— dfir_it (@dfir_it) May 10, 2016
@jackcr File: size, ext, owner, location, content. Request: UA, URI/params, internal 2 internal, interval/duration/size of requests
— Glenn (@hiddenillusion) May 10, 2016
Let me digress a little about the last recommendation. First of all, as you know, AV is not a fail-safe mechanism, so you cannot trust it fully. AV products do not protect against all types of attack vectors. It is relatively easy to bypass AV. As a result, you can at least block known malicious code (detected by signatures or heuristics) - not ideal but still an advantage.
When you’ve got AV on your web server (or any other machine for that matter) you need to know that there are costs involved:
The whole series was intended to familiarize you with how popular, diverse and at the same time dangerous are attacks leveraging webshells. As the second part of this series showed, crooks aim was targeting specific companies and webshells are only a small part of bigger plan. Variety, diversity and simplicity of webshells causes the defense against them to be a very difficult task. Even if you fill all the recommendations of the section “prevention and mitigation” does not guarantee that your application/environment is 100% safe, but it is important to build security in a comprehensive manner and to leave as little space as possible to beat our “entanglements” ;) Keep fighting! Keep defending!
]]>At the end of March last year, news about big DDoS attack against Github hit the media. Many security researchers started analysing, what type of attack generated such amount of traffic directed to github.com. After few days Netresec released a blog post describing what exactly has happened.
Long story short:
The important thing to note is that not all requests were answered by the Great Cannon. As reported by Google number of requests varied between 6% at the beginning of the attack with maximum spikes reaching 17,5% of traffic destined to baidu.com. That was a huge number taking into account how many Asian websites are using Baidu Analytics. The whole campaign was well planned and executed.
Above situation with Great Firewall of China was a good example of JavaScript-based DDoS triggered by man-in-the-middle attack. Take a look at below drawing showing that method.
Volumes of such attacks are related to popularity of the domain. The more requests intercepted the larger DDOS attack would be generated. Another variation might be achieved by injecting malicious JavaScript in HTTP responses intercepted by open proxies.
To prevent this kind of injection you can block JavaScript in your web browser using popular add-on NoScript. That’s protection from client point of view, but what administrators could do for their users ? They SHOULD start using SSL ;).
You may remember our rant about Confidence 2015 conference and how we were a little bit disappointed with the talks. Guess what, there was one shining star! It was presentation done by Jim Manico. Not exactly a rocket science but I exactly remember his main motto: HTTP is over! Time to switch to HTTPS!
I fully agree with Jim. There is no excuse to serve HTTP content which could be easily intercepted and modified. If you want to be regarded as a trusted and safe partner on the market, you need to launch HTTPS. For many small business new chance is just around the corner - Let’s Encrypt project is approaching a final phase. It’s a great opportunity to make the Web a safer place. No more excuse regarding performance which is briefly explained here, dispelling few myths. In short, TLS features plus new version of HTTP standard, HTTP/2, should resolve all your concerns in this matter.
Unfortunately, encrypting traffic will not resolve other types of JavaScript-based DDoS attack. There are two scenarios, I would like to mention here.
First situation is when the user requests a valid JavaScript file, but in response receives malicious JavaScript, which was replaced on the compromised server. It’s a tough case, because from user point of view, he/she cannot expect that valid source will serve malicious content.
Secondly, nowadays many web developers would like to speed up the development process by using third party libraries instead of writing own code. Of course, this solution has many advantages (i.e. saves time and money), but it also adds additional code that is outside of control.
In September 2014, RiskIQ reported that jQuery.com’s website was compromised. jQuery is one of the most popular JavaScript library (around 30% of all websites using some version of it as of 2014). As a part of this attack it could have easily been replaced with a malicious one and infect millions of webpages using that lib. This kind of attack is no longer theoretical but a real danger.
So in both cases described above, simply by navigating to a legitimate web page your computer can become a part of DDoS attack. I recommend blocking JavaScript execution in your web browser by default. It’s better to have full control on what executes on your computer ;)
P.S. It was not a first incident where Great Firewall of China was involved and I’m sure that it was not last.
Late summer last year, you could read few notes (1,2) or thread advisory regarding Linux trojan named Xor.DDoS, using infected machines in different DDoS campaigns. It was researched by MalwareMustDie team two years ago. The name stems from the heavy usage of XOR encryption in both malware and network communication to the C&Cs.
Attackers use the following vectors to infect machines:
Malware copies itself to the following files:
/boot/<10 random alphanumeric chars>
/lib/udev
The malware sets the following permissions on the created files:
1 2 3 |
|
To ensure persistence, the malware executes processes to determine if the main process is still running. If not, it creates and executes a new copy in /boot
. The process is hidden using common techniques like masking itself using the name of a common Linux tool like top
etc.
1 2 |
|
That’s only a small piece of all actions done by this malware - MMD team has a very detailed analysis on their blog.
Moreover, in the middle of last year the same team discovered that XoR.DDoS used an iptabLes|x strategy in their infection process - take a look at paragraph “Linux/killfile” ELF (downloader, kills processes & runs etc malware).
For persistence the malware creates an init.d
script with random name. Run the following command to check for the presence of the script:
1 2 3 4 5 6 |
|
File itself is a non-stripped ELF, written in C language. It is a nice example of well-written executable malware to infect multi-platform Linux environments with multiple persistence mechanisms. It is not as typical DDoS bot written in a high-level scripting language like Perl or PHP with really straightforward operations.
The IP addresses it would communicate with were encoded into binary. When it called into action then affected server start flooding victim IP.
One of them (using brute force campaign as an initial step) was described by FireEye in blog post at the beginning of last year.
In short, whole campaign was focused on gaining access to servers around the world. Part of the attack was targeted at FireEye’s global threat research network (honeynet). It’s worth to mention that it was really extensive campaign - in three months each server (from FireEye network) logged nearly ONE million login attempts!
If root access was obtained then attackers IPs (103.41.124.0/24) would log out and stop any further activity. In the next 24 hours another IP accessed the server and would run a SSH remote command (openSSH feature - multiple shell commands, separated by semi-colons). The malware extracted kernel headers and version strings from victim server and prepared customized malware on a separate build server. Whole process worked against hash signature-based mechanism. If there was a problem with building proper version then it used pre-build solution.
Main purpose of this campaign was to infect as much servers as possible with the XoR.DDoS malware and use it in DDoS attacks. Few of them were observed by Akamai SIRT and presented in their threat advisory. Attack generated by XoR.DDoS botnet ranged from a few Gbps to 150+ Gbps mostly in gaming business. To imagine how huge volume was generated compare it to North Korea’s total bandwidth. Incapsula’s security researcher, Ofer Gayer, estimated at the end of 2014 that at around 2.5 Gbps, so the attack generated by XoR.DDoS was 60 times or more bigger than total country traffic!
The material presented above, shows how much DDoS business has changed. Attackers are looking for new different methods to generate high volume distributed attacks like:
You could say that developing itself is nothing new and that’s true, but the scale of this phenomenon is much greater and people who work on it are much more advanced and well prepared (at various levels - skills, organization, marketing). It gives the conviction that a group of people responsible for DDOS attacks and their capability grows rapidly.
The above thesis is confirmed by reports of two leading companies dealing with mitigation of DDoS attacks. Akamai Technologies report outlines following characteristics:
Similar trends are described in Imperva report.
At the end of the day what haven’t change about DDOS attacks is the purpose that remains the same. Politics and money. Example of ProtonMail shows that even if you pay to criminals, it doesn’t guarantee that attack will not take place. In some cases, it actually gives you the opposite effect, because attackers knows that the one who will pay once will probably pay next time. Which is sad… if you don’t pay they will perform DDoS attack for sure …, so be prepared and invest in proactive measures to protect your infrastructure against DDoS attacks!
]]>Analysis of the following case could quite easily lead to various discussions about basic security controls, risks or responsibilities of involved parties. Most of you probably have experienced different recipes for disaster made of more or less obvious vulnerabilities, system misconfiguration and problems existing between keyboards and chairs. Let’s put this discussion aside and focus on the facts and the main topic of the day - webshells used during targeted attack!
During most of the engagements one of the most crucial part of the investigation is to find an entry point of potential intruders. That was exactly the case when alerted by the OPS team recovering from a massive incident that affected a farm of web servers I realized that the whole farm was infected with a combination of custom made backdoors, rootkits and password dumping tools (NOTE: not discussed in this post!).
Timeline analysis of artifacts left by malware and lateral movement activity from multiple machines identified the suspected server where the first malware sample was installed. The only question was how the hell someone planted malicious files on an internal web server farm in the first place? A good place to start was the fact that malware was executed under the context of application server service account. Bad news was it had administrative privileges.
I never worked for any law enforcement agency nor I knew someone at that time who could shed some light on best tips how to ask question to collect all the necessary information. Maybe a proper course of interrogation techniques would do the trick. Nevertheless, to perform successful investigation you need to get a lot of information (context) from different entities to build a bigger picture and better understanding of the systems, infrastructure, business processes etc. Analysis of the available data should confirm most of the information provided. But where do you start when you know that a server contains a dozen or more business applications with thousands lines of code accessible by internal users and there is no obvious starting point? You prioritize the application based on the functionality, availability and the exposure.
During the discussions about application functionality one of the OPS guys used the magic words that instantly set the alarms off:
The moment when spider sense started tingling. Shall we analyze some application logs?
Tomcat application servers when installed as a windows service will log messages from the web applications to stdout.log
. As with most of the standard output logs you’ll see a huge stack traces of activity dumped by the application especially a busy production one. However after reviewing endless lines of Java messages this particular one caught my attention:
1 2 3 4 5 6 |
|
Quickly reviewing errors in close proximity allows to identify other interesting files:
1 2 3 4 |
|
If the first error message was not convincing enough the latter shows someone trying to write to a file what looks to be a very tiny yet powerful webshell. It’s time to pull the files to see exactly what are we dealing with:
1 2 3 4 5 6 7 8 9 |
|
This simplistic servlet receives a command via cmd
parameter, tries to execute it on the system and returns the command output. Making it exactly what you need to maintain control.
‘Riddle me this’ says a good friend of mine every time he’s puzzled with the data and faces problems during the investigation. It was also something I was constantly asking myself but no one at the time was there to answer it. Application logs suggested that someone dropped webshells to the central storage location however it was still not clear how this was achieved. Unfortunately, the retention of the logs did not cover the full timeline of the incident so some of the logs were missing. Fortunately, I knew the name of the application that saved webshells in its directories, which allowed me to focus my attention on specific web application traffic. Shall we analyze some web server logs?
Scrolling through log entries the following entry caught my attention. It looks that application is being forced to execute the system command to view network configuration:
1 2 |
|
Searching logs for all instances of redirectAction:
reveals additional data e.g.
1 2 |
|
This log shows an attempt to write the aforementioned webshell to the shared application folder. A bit of googling and testing reveals this HTTP request attempts to exploit a known Struts 2 vulnerability CVE-2013-2135. The timestamp of this activity backed by timeline analysis of all the artifacts collected from servers in the web server farm reveals we have found our initial point of compromise.
A picture is worth a thousand words so this is how it looks after putting all the pieces together:
Moral of this story is simple. Webshells are part of sophisticated actors arsenal utilized at different stages of the attack, whether it is gaining initial foothold or maintaining persistence. More importantly defenders and incident responders won’t always have all the required data for analysis. Access logs might be already overwritten however every attack leaves more than one artifact across multiple systems. This engagement was saved by the application logs and the fact that bad guys are humans doing what humans are great at - making mistakes.
Mandiant blogged about combination of Struts2 vulnerability and webshell attacks couple of months ago. CrowdStrike shared a story of HURRICANE PANDA and DEEP PANDA using China Chopper webshells. Both are a very good and complementary read and highly recommended to everyone interested in such case studies.
]]>Lines
No wonder why DEFCON has an alternative name: LINECON. I can’t really tell if the lines were bigger or smaller this year when compared to previous years. I know one thing for sure - I should have joined the line for badges several hours earlier… On the other hand it wasn’t that bad - folks in the lines seemed to enjoy beers and chats with random people.
Talks
Five official tracks with about ten talks daily in each. Add talks and presentations in the Villages and your schedule gets really busy. At some point I decided to explore other parts of the conference and to not attend many talks as they can always be viewed later online. I must admit though, I spent considerable amount of time at SKYTALKS - organizers were rather strict about not recording any talks and I don’t feel like I wasted my time there!
Villages
There were about a dozen of Villages - just to name a few: Packet Capture, Wireless, Social Engineering or BioHacking. I was impressed how some of them were really well equipped (ICS Village) and how they gathered more people than some of the conferences I attended to this time.
Demo labs
As DEFCON organizers describe this new idea: “a poster board session but with computers”. Some of the presentations sounded really promising (SDR hacking, Fiber Optic tapping, Haka workshop) - too bad I missed all of them.
Workshops
10+ free, (half-)day long workshops. By the time I learned about them all seats were taken. It’s definitely something I want to try next year!
Competitions
Starting from official CTFs (Legit BS, OpenCTF), through more specialized (Network Forensics Puzzle, Crack me if you can, Wireless CTF, Intel CTF) and ending up with more obscure events (why did I miss TCP/IP Drinking Game!?). With about 25 such events there’s always something to choose from!
Badges
After I got my DEFCON badge it took me a while to realize that I have been trolled. This year’s official DEFCON badge was a playable 7” vinyl record. It was really funny to see thousands of participants wearing vinyl record badges. It was even funnier to see non-participants giving them strange looks.
Parties
There were just too many of them. Too bad I didn’t manage to attend at least some of them. I guess I now have a whole year to polish my social engineering skills.
Las Vegas
It’s a real Hell on Earth (and I’m not only speaking about the weather). Biggest complaint I have is that Las Vegas is too far away from the place I live and it’s impractical (and not cost-effective) to fly there just for the conference. On the other hand I can’t imagine other place that could accommodate 20k participants…
To keep it short: I really enjoyed my time in Las Vegas. It was my first time at DEFCON and I felt a little bit overwhelmed by all the things happening there. I didn’t have a plan for where and what to do. That’s the thing I’d like to fix next year - go there with a plan and engage more in awesome events happening there. I hope to see you there at DEFCON 24!
]]>Lesson learned from the #BHUSA Arsenal @peepdf challenge. Before you start, first update your tools! Thanks @EternalTodo it was great fun!
— dfir_it (@dfir_it) August 4, 2015
If you want to follow along the link to the challenge can be found below:
The #BHUSA Arsenal @peepdf challenge is out! http://t.co/JWtdod4OEz Be free to play with it! ;) RT pls! @BlackHatEvents @ToolsWatch @NETpeas
— Jose Miguel Esparza (@EternalTodo) July 26, 2015
Let’s see what’s inside the PDF file:
1 2 3 4 5 6 7 8 9 10 11 12 13 14 15 16 17 18 19 20 21 22 23 24 25 26 27 28 29 30 31 32 |
|
Output of peepdf provides information about various suspicious elements which include EmbeddedFiles
. Interestingly enough it also contains JS
and AA
elements which are often starting point of any analysis. Reviewing EmbeddedFiles
reveals additional metadata about the file:
1 2 3 4 5 6 7 8 |
|
/Names
suggests that we have a pdf inside of another pdf. Dumping the file can be achieved by:
1
|
|
Analysing peepdf.pdf:
1 2 3 4 5 6 7 8 9 10 11 12 13 14 15 16 17 18 19 20 21 22 23 24 25 26 27 28 29 30 |
|
We see a very handy feature of peepdf which is information about known CVEs. Instead of jumping to the first JS
object, let’s review the relationship between the objects to better understand structure of the file:
1 2 3 4 5 6 7 8 9 10 11 12 13 14 15 16 17 18 19 20 21 22 23 24 25 26 |
|
It seems that object 5
uses annotations and as we know this pdf likely contains a known getAnnots vulnerability it’s definitely worth looking at:
1 2 3 4 5 6 7 8 9 |
|
The above code checks the version of the software (the reason being is getAnnots vulnerability). If version is greater than 10 it closes the document. If not the following function peepdf(r(a,x.d(this.info.author)));
is executed.
Let’s check the object containing getAnnots vulnerability:
1 2 3 4 5 6 7 8 9 10 11 |
|
This function takes the annotation’s subject, splits it and performs decoding.
If you take a closer look at tree
output once again one of the /Annot
objects contains additional stream:
1 2 3 4 5 6 7 8 9 10 11 12 13 14 |
|
Using SpiderMonkey we can decode this subject to more readable form:
1 2 3 4 5 6 7 8 9 10 11 12 13 14 15 16 17 18 19 20 21 22 23 24 25 26 27 28 29 30 31 32 |
|
After executing the code following output appears:
1 2 3 4 5 6 7 8 9 10 11 12 13 14 15 16 17 18 19 20 21 22 23 24 |
|
Keep in mind that after opening the original file the following code peepdf(r(a,x.d(this.info.author)));
will be executed. We now have found the definition of associative array x
which contains function d
and takes this.info.author
as a parameter.
this.info.author
can be found by reviewing the Info
object:
1 2 3 4 5 6 7 |
|
and following the /Author
reference:
1 2 3 |
|
Alright, we still need to find definitions of peepdf()
, r()
, and a
variable.
Let’s use the output from the tree
command and go through all the /JavaScript
elements one by one:
1 2 3 4 5 6 7 8 9 10 11 12 |
|
First stream contains value of variable a
:
1 2 3 4 5 6 7 8 9 10 11 12 13 |
|
Second stream explains that peepdf()
is really an eval()
function:
1 2 3 4 5 6 7 8 9 10 11 |
|
Third /JavaScript
element contains definition of the function r()
which seems to be a decoding function that accepts key and message as parameters:
1 2 3 4 5 6 7 8 9 |
|
It looks like we finally have all the the pieces of the puzzle to execute the code in SpiderMonkey:
1 2 3 4 5 6 7 8 9 10 11 12 13 14 15 16 17 18 19 20 21 22 23 24 25 26 27 28 29 30 31 32 33 34 |
|
This results in the following output:
1 2 3 4 5 6 7 8 9 10 11 12 13 14 15 16 17 18 19 20 21 22 23 24 25 26 27 28 29 |
|
Solution to the challenge consist of the annotation /Subj
and /Producer
which are passed to calc()
function.
Annotation subject can be found in the other /Annot
object:
1 2 3 4 5 6 7 8 9 10 11 12 13 |
|
Adding /Subj
and /Producer
gives the following string “Black Hat US Arsenal 2015 - peepdfPeepdf Library X” which is passed to function calc()
. Function calc()
is a JavaScript implementation of MD5 and can be found in object 24
.
MD5 of the string is the solution to the challenge: 5af109e5f2e7770bf7f88bfde448d2fe
That was a pretty cool challenge! Be sure to check out Jose’s walkthrough:
Check how to solve the #BHUSA Arsenal @peepdf #challenge! It was not easy ;) http://t.co/lkd3OwqCjH Congrats to @Antelox @dfir_it @___wr___!
— Jose Miguel Esparza (@EternalTodo) September 9, 2015
Fortunately, this was done at filesystem level with rm -rf /
command.
1 2 3 4 5 6 7 8 9 10 11 12 |
|
This means the data should still be there. But how to recover it?
Solaris uses /var/adm/wtmpx file which is in some way similar to /var/log/wtmp from Linux but unfortunately is incompatible. Also this
system is based on SPARC architecture which is big-endian so in contrast to Intel x86
(little-endian) the integers are stored in reverse order. This means we cannot use Linux native tools like last
to parse contents of a
wtmpx file from Solaris. In order to recover it we need to know the exact structure. The easiest way to understand the format is to look at
the source code of programs that read and write to wtmpx files. Since the target system is Solaris, the format is very likely to be found in
/usr/include/utmpx.h C include file.
Here is an excerpt from Solaris 10’s utmpx.h:
1 2 3 4 5 6 7 8 9 10 11 12 13 14 15 16 17 18 19 20 21 |
|
Each wtmpx entry is exactly 372-byte long (aligned to 4 bytes!) and it starts with an username trimmed to 32 bytes. Based on this information we can create a pattern for scalpel - well known file carving utility. In this case, we want scalpel to scan for specified string of bytes (header) and then save 372 byte long chunks of data that follow the header. If you want to learn more about the configuration file syntax, I encourage you to review the manual page or the configuration file itself where you will find many examples.
1
|
|
Let’s run it on the partition image and see the results!
1 2 3 4 5 6 7 8 9 10 11 12 13 14 15 16 17 18 19 20 |
|
After a minute the tool carved eight files out of the image.
1 2 3 4 5 6 7 8 9 10 11 12 13 |
|
1 2 3 4 5 6 7 8 9 10 11 12 |
|
The entries look valid. We can easily spot account name, console and source IP address this session originated from. We miss other important
piece of the puzzle: timestamp and event type. We need to write a parser that will allow us to extract detailed information of each
event (entry) similar to how last
command does.
I created a quick and dirty python script that benefits mostly from struct module to handle binary data. This module has a function called
unpack()
especially designed to parse binary and structured data according to a given format. Format strings are used to specify the
expected layout when unpacking data. They are build up from format characters which specify the type and size of data being unpacked. I
strongly encourage you to review documention for struct module first in order to understand
better the meaning of format characters.
It is worth mentioning that I had to use pad bytes in the format string in order to maintain proper alignment for the futmpx struct involved.
Don’t be surprised if your calculations are not in accordance with sizeof(struct futmpx)
- this is the way data structures are stored in the
memory.
1 2 3 4 5 6 7 8 9 10 11 12 13 14 15 16 17 18 19 20 21 22 23 24 25 26 27 28 29 30 |
|
Now it’s time to see this code in action. My script takes only a single file as an argument so I use the following command line kung-fu to parse all files (in this case single wtmpx entries) at once and sort by the timestamp:
1 2 3 4 5 6 7 8 9 |
|
Works like a charm! But there is still area for improvement. This code does not convert the time to the correct time zone. Take this into account before building a timeline.
Solving this case would not be possible without this promising technique. The compromised system was configured to keep track of only unsuccessful authentication attempts leaving wtmpx records as the only reliable source of information about the origin of the attack. The person responsible for the destruction of this system was too confident - deleting all files is not enough to cover all tracks. Now personal details of this individual are known and the case is closed. Cheers!
]]>These attacks are really common nowadays because of the nature of the Internet. Millions of web servers seems to be attractive targets for attackers. When you think about the role of the web servers in the organizations then the attractiveness of such targets is even greater.
Over the years the Internet has changed. Web servers are not only responsible for displaying simple private or business websites. Development of languages such as JavaScript, PHP, Python or Ruby have already begun to play a significant role in business applications, online shops, internet entertainment, blogs or others. Those applications are often created using off the shelf products accessible to the rest of the world which results in numerous vulnerabilities. Who didn’t hear for instance about another vulnerability in Wordpress or phpBB recently? Such popular web applications have become the main target for the groups trying to build their botnets or spread malware. When another 0-day is published, the attackers try to obtain access to victim machines on a large scale. They start massive scanning for vulnerabilities as long and wide the Internet is. Some of attacks aimed at the web servers, can be more severe if web server become a gateway to the internal infrastructure - more on that later.
I’m going to present three different examples how attackers try to bypass security measures and upload webshells on target systems - including RFI (Remote File Inclusion) and SQL injection.
Below is a log entry presenting an attempt to execute code using RFI vulnerability.
1 2 3 4 |
|
Many of the common RFI exploit scripts, as well as attack payloads sent by hackers append the ?
symbol to the included (malicious) URL. In order to avoid the issues with developer supplied strings appended to the URL by the application. It is similar to SQL injection utilizing comment specifiers (--
, ;--
or #
) at the end of their payloads.
Attacker tried to trick the web application to include a JPG file from the remote server. Is it really a JPG image? Let’s take a closer look:
1 2 3 4 5 6 |
|
As you can see above, it’s not an image at all - although it contains a valid GIF file header. Trustwave has an interesting blog post that provides more details on how attackers can hide malicious code in the image files. Let’s analyze the beginning of the PHP code:
1 2 3 4 5 6 7 8 9 10 11 12 13 14 15 16 17 18 19 20 21 22 23 |
|
Class pBot
defines an array with all the config information. Probably server
and port
fields caught your attention as it provides information about C&C that potential bot will be trying to communicate to. Before we check what is behind the irc.malink.biz
, I would like to know something more about domain malink.biz
itself. Using Passivetotal service we can check the history of that domain and actual whois records.
Owner from USA with all personal data available?! Is this what you would expect from suspicious domain? Maybe a homepage will give us some answers…
nothingsecure
…OK, now it seems to be more logical :) Info from IRC is also giving clear answer about intentions:
Ok, so let’s take another step forward and focus on irc.malink.biz
.
1 2 3 4 |
|
They care about failover ;)
To sum up geo - server in Paris received a crafted request from host in Madrid with a link to the domain sxxxxxxo.no
(Columbus, OH) to download a file byroe.jpg
with embedded webshell. Inside of the file, we found IRC server irc.malink.biz
which resolves to more than one IP - load balancing DNS records using round robin method (Germany, UK, Canada).
How does it look like ? :)
Virustotal confirms AV detection rates seems not too bad. At this point, it’s worth to mention that it’s NOT good to upload any files to VT as a first step of the analysis. Start with OSINT research. For example, before you upload the file, check if file’s hash is not already stored in VT database. Sharing potentially malicious files (remember that VT database is public!) might warn an attacker and give him a chance react quickly.
Images are not the only way how attackers try to bypass the WAF.
The attackers might try to hide their intentions by encoding and compressing the malicious code. This allow to bypass some of the filters and signatures used by WAFs. Another RFI attack:
1 2 3 |
|
Content of the suspicious file:
1
|
|
This is a typical example of obfuscated PHP code. It will be passed to the eval() function for execution, but before that it needs to be:
There is also a more troublesome version of this. Imagine multiple layers of obfuscated code using the same functions as presented before. Obtaining the original code requires repeated decoding, so manual work with the PHP interpreter ceases to be comfortable. In case you stumble upon such sample then I suggest to use phpdecoder
.
Here’s the code after deobfuscation:
1 2 3 4 5 6 7 8 9 10 11 12 13 14 15 16 17 18 19 20 21 22 23 24 25 26 27 28 29 30 31 32 33 34 35 36 37 38 39 40 41 42 43 44 45 46 47 48 49 50 51 52 53 54 55 56 57 58 59 60 61 62 63 64 65 66 67 68 69 70 |
|
First part of the code is sending email confirmation about infection to setoran404@gmail.com
. After that there is a code responsible for command execution on infected system and printing output on the page. “Production” example found on the Internet:
As you can see an attacker uploaded a few more “add-ons” like Mailer-1.php
, Mailer-2.php
, 1337w0rm.php
etc.
Again I use VirusTotal to check AV detection ratio:
This time not so good - most of AV engines did not recognize file as suspicious.
Take a closer look at the following example:
1
|
|
First of all attacker needs a SQL Injection vulnerability. Next a specially crafted request will inject PHP code which will be saved on the server.
Explanation:
1
|
|
This is a simple webshell that will be used to execute commands on the web server. Depending on the SQL injection vulnerability attacker needs to place it in appropriate column. In this example the table has three columns. Code will be placed in the second one with others set to NULL.
1
|
|
This SQL command allows attacker to write the webshell code to an arbitrary file.
1
|
|
Path where webshell will be stored. Important thing to note is that attacker needs to find directory on the server with write access e.g. temporary folders. In addition to that crooks have to find a way to force application to execute webshell script in this case this can be achieved via LFI. Following example includes all the above dependencies.
After executing the SQL query the webshell file is created. Now the attacker can interact with the webshell by simply sending a HTTP GET request and defining the following URL:
1
|
|
The directory listing of /var/www
will be returned by the server. Et voilà!
At the end, check how VirusTotal looks for that simple one-line webshell:
Perfectly invisible ;)
If you would like to read or watch more, take a look at article on greensql or YouTube movie.
With three brief examples we’ve just scratched the surface of this interesting topic. There are many other different ways to place and execute arbitrary code on a remote server and interact with OS. In the second part I’d like to focus on a case which shows how dangerous webshells can be for a business infrastructure and describe methods to protect against them.
]]>Toxic PDF instruction states: “Don’t be afraid to walk through the door (if you can)…”
After opening the crackme.pdf
the following screen appears:
Door would open only when correct key is entered. But where can we find the key?
Whenever I need to analyze maldocs, malicious scripts, phishing emails my go-to platform is REMnux. I can’t emphasize how cool it is to have all the tools for reversing and malware analysis at one place!
Let’s crack on with the PDF analysis. For this we’ll use great tool peepdf created by Jose Miguel Esparza.
1 2 3 4 5 6 7 8 9 10 11 12 13 14 15 16 17 18 19 20 21 22 23 24 25 26 27 28 29 30 31 32 |
|
Usually when analyzing malicious PDF documents objects like AcroForm, AA(Additional Actions) or JavaScript are the the most interesting to look at. As object 913
is on both AA and JS lists it seems to be a good starting point.
1 2 3 4 5 6 7 8 9 10 11 12 13 14 15 16 17 18 19 20 21 22 23 24 25 26 27 28 29 30 31 32 33 34 35 36 37 38 39 40 41 42 43 44 45 46 47 |
|
Based on the above output we can see that Click to open the door
action is handled by JavaScript object 904
. This may include some sort of password validation code:
1 2 3 4 5 6 7 8 9 10 11 12 13 14 15 16 17 18 19 20 21 22 23 24 25 26 27 28 29 30 31 32 33 34 35 36 37 38 39 40 41 42 43 44 45 46 47 48 49 50 51 52 53 54 55 56 57 58 59 60 61 |
|
Obfuscated code! That looks suspicious. Let’s dump it and look if we can deobfuscate the code.
1
|
|
One of my favourite tools to analyze JavaScript is SpiderMonkey which is a JavaScript engine. It’s an easy way to run blocks of code to see what will be the result.
For instance in the above code, functions mmu7d()
and mz821a()
are used for string manipulation. You can put those functions into a file decode.js
, then load the file into SpiderMonkey.
1 2 3 4 5 6 7 8 9 10 11 12 13 14 15 16 17 18 19 |
|
This makes our code more readable:
1 2 3 4 5 6 7 8 9 10 11 12 13 14 15 16 17 18 19 20 21 22 23 24 25 26 27 28 29 30 31 32 33 34 35 36 37 38 39 40 41 42 43 44 45 46 47 48 49 50 51 52 53 54 55 56 57 58 59 |
|
It seems that last line of the code invokes all the functions. Let’s break it down:
as6z + hanm4
concatenates string variablesh7()
invokes unescape()
enx(dstring,key)
decodes string
with a key
my6()
invokes eval()
To see the results just comment out the following code and print()
the results instead of eval()
:
1 2 3 4 5 6 7 8 9 10 11 12 |
|
Now run it in SpiderMonkey:
1 2 3 4 5 6 7 8 9 10 11 12 13 14 15 16 17 18 19 |
|
Condition included in raven()
function reveals that the key is comprised of the value of the e
field and the word antistring
.
What is the e
field value and where we can find it?
Let’s go back to the object 913
. Fields name seem to be defined with /T
, for instance:
/T(door)
/T(msg)
/T(door2)
If we look closer /T(e)
is present in the output of the object 913
.
Next to it, there is a value /V
of 9053d91a70acfd6614f0243caac70ce2
.
1 2 3 4 |
|
Well, it turns out that 9053d91a70acfd6614f0243caac70ce2antistring
is our key.
During the initial analysis peepdf
reported two JS objects (880, 904). We already know everything about object 904
. What about the other one?
1 2 3 4 5 6 7 8 9 10 11 12 13 14 15 16 17 18 19 20 21 22 23 24 |
|
This object also includes an obfuscated string. It took me a while to realize what it is. whisper()
seems to be another decrypting routine that accepts string to be decrypted and key as parameters. We have the message (pluto
) and now we know the key right? What if…
1 2 3 4 5 6 7 8 9 10 |
|
Thank you BSides London and thank you Liviu Itoafă for creating this challenge. I am still not sure if this is the right way to solve the challenge but it was fun!
]]>Nowadays Microsoft Office documents are a collections of XML files stored in a ZIP file. Historically storing multiple objects in one document was challenging for traditional file systems in terms of efficiency. In order to address this issue a structure called Microsoft Compound File Binary also known as Object Linking and Embedding (OLE) compound file was created. The structure defines files as hierarchical collection of two objects - storage and stream. Basically think of storage and a stream as directory and a file respectively.
Another objects that you might encounter in the OLE files are macros. Macros allow to automate tasks and add functionality to your documents like reports, forms, etc. Macros can use Visual Basic (VBA) which is where bad guys will often try to hide their malicious code. This is what we are after in this handbook - finding and extracting malicious code from OLE files!
Lenny Zeltser created an awesome cheat sheet for analyzing malicious documents. Generally it contains the following steps:
Analysis will be carried out in REMnux a free Linux Toolkit for Reverse-Engineering and Analyzing Malware.
The easiest and quickest option is to download ova
file and set up REMnux on a virtual machine. Keep in mind we will be analyzing malicious script so be sure to do it properly. I will not describe how to set up malware environment in this post however there are plenty of available resources here, here, here and here.
If you want to follow along with the examples you can grab the file from www.hybrid-analysis.com.
Personally I like to start with a file
command to get a better feeling of what am I dealing with.
1 2 3 |
|
Output provides a lot of useful information including:
Compound Document Format (CDF) as described in the introduction section contains multiple different objects.
Let’s take a closer look.
First we will examine file with oledump.py
written and maintained by Didier Stevens.
1 2 3 4 5 6 7 8 9 10 11 12 13 |
|
One of the cool things about oledump.py
is its ability to mark streams that contain VBA code. In the above output we can see two streams called NewMacros
and ThisDocument
. Letters M
and m
indicate that VBA code is present. Lowercase m
means VBA contains only attributes statements (less interesting):
1 2 3 4 5 6 7 8 9 |
|
Given stream can be viewed by adding -s
with an object number. As we know we are dealing with the VBA code the -v
option will instruct oledump.py
to decompress VBA code and make it easy to read.
Let’s dump it for later comparison with other tools.
1
|
|
Now let’s move to the stream marked with capital M
, this is usually where analysts find juicy stuff:
1 2 3 4 5 6 7 8 9 10 11 12 13 14 15 16 17 18 19 20 21 22 23 24 25 26 27 28 29 30 31 32 33 34 35 36 37 38 39 40 41 42 43 44 45 |
|
It is safe to say we found our malicious code! We will dump the code for further analysis.
1
|
|
Before we will delve into deobfuscation and code analysis let’s see how other tools cope with the same malicious file.
officeparser.py
by John William Davison prints similar information as oledump.py
, however it does not help analysts with marking objects containing VBA code.
1 2 3 4 5 6 7 8 9 10 11 12 13 |
|
Even though officeparser.py
does not highlight object of interest, macros can still be extracted with the --extract-macros
option:
1
|
|
Each macro object found will be saved to a separate file:
1 2 3 4 5 6 7 8 |
|
officeparser.py
dumped exactly the same content as oledump.py
:
1 2 3 4 5 |
|
OfficeMalScanner
written by Frank Boldewin is less interactive but it automatically finds and extracts malicious code for further analysis. This is handy when we are interested in fast triage and code analysis only. OfficeMalScanner
is not included in the newest REMnux v6.
1 2 3 4 5 6 7 8 9 10 11 12 13 14 15 16 17 18 19 20 21 22 23 |
|
Let’s check the files:
1 2 3 |
|
OfficeMalScanner
was able to extract the same streams. The file NewMacros
containing malicious script is exactly the same as extracted by other tools, however the file ThisDocument
has different MD5 hash. By checking the content (omitted for brevity) it seems to merge parts of code from both streams containing VBA, which might confuse some of the analysts.
olevba.py
created by Decalage performs all the steps of the process including the basic analysis of the code:
1 2 3 4 5 6 7 8 9 10 11 12 13 14 15 16 17 18 19 20 21 22 23 24 25 26 27 28 29 30 31 32 33 34 35 36 37 38 39 40 41 42 43 44 45 46 47 48 49 50 51 52 53 54 55 56 57 58 59 60 61 62 63 64 65 66 67 68 69 70 71 72 73 |
|
Unfortunately neither of the tools is able to deobfuscate the code it would be too easy! So far we researched different methods of finding and extracting malicious code from OLE documents. It is high time to deobfuscate this bad boy!
There is never a “one fits all” solution to deobfuscate code. Good thing to start with is to clean up the code from randomly generated variable names. For this just open the code in any text editor and use “find and replace” feature to replace randomly named variables into something more readable.
I like to rename variables so they start with capital letter informing me about the variable type, for instance:
S_var1
means this variable is of a String
type.This is how code looks like after initial clean up:
1 2 3 4 5 6 7 8 9 10 11 12 13 14 15 16 17 18 19 20 21 22 23 24 25 26 27 28 29 30 31 32 33 34 35 36 37 38 39 40 41 42 43 |
|
Obfuscation seems to rely on string operations. Next step would be to perform all operations on String
variables, for instance:
1 2 3 |
|
After a few operations code becomes much more readable:
1 2 3 4 5 6 7 8 9 10 11 12 13 14 15 16 17 18 19 20 21 22 23 24 25 26 27 28 29 30 31 32 33 34 35 36 37 38 39 40 41 42 43 |
|
Code analysis summary:
AutoOpen()
will be executed after the document is opened.ProudtoBecomeNepaliReverseEngineer
is just an alias to URLDownloadToFile()URLDownloadToFile()
accepts five parameters, including URL address http://ge.tt/api/1/files/2gmBurF2/0/blob?download
and a file name
C:\Users\Public\Documents\SbieCtrl.exe
.It’s never a good option to rely on only one tool. Analyzing malicious documents is all about finding, extracting and analyzing malicious code. What would happen if bad guys used different obfuscation methods, document types or came up with new unknown technique? Would you be prepared with your current toolset? Having backup plan and additional tools in your toolset makes you ready for such scenario. In our short analysis OfficeMalScanner
was not able to extract both streams correctly. What if this was your go to tool? Would you be able to perform analysis? I am not saying that any tool described in this post is better or worse than the other, all of them are great tools and allow you to do things differently it all really depends on your requirements. For instance officeparser.py
and oledump.py
allow you to interact with the file internals, however this might not be the most efficient approach if you have to analyze few documents where writing a while loop and using OfficeMalScanner
or olevba.py
to dump the malicious code will do the trick for you.
Never limit yourself to one tool, programming language or operating system. Be flexible and open-minded, have a backup plan, a proper toolset and you will be better prepared for the upcoming challenges!
]]>Big THANK YOU to :
I wanted to use this section to describe the presentations that influence me in one way or another and are worth spreading. Please don’t get me wrong. It is not that there was nothing interesting at CONFidence this year. The last thing I intend to do is to sound like a troll or hater. There are a few things that CONFidence got me thinking about and I really need to get it off my chest.
Defenders need to get better at making their work more visible. It’s tough! I know. You might have heard a few times phrase ‘Defense is not sexy’. Even I mentioned this in the past. But then again I am starting to realize that maybe we don’t put enough effort to make it interesting for others. Inspire people by showing how responding to real threats and defending customers is one of the biggest challenges in the industry. There’s an awful lot of young guys in my team with mindset of becoming pentesters because it’s cool to pop a shell here or there. I’ve seen people passing OSCP, which is not the easiest thing to do, and struggle to find evil. Defending is hard, defending is challenging, let’s make it more visible, interesting and inspiring!
I’ve seen a lot of brainy guys who were amazing pentesters that eventually got bored and transitioned into IR and were very successful at it. However it was a process - not something they did over night. The thing I am trying to emphasize here is just because you know how to attack does not mean you know how to defend. Pentesters can become awesome defenders but pentesters by default ARE NOT awesome defenders.
Please don’t say that just because you wrote your own piece of basic code that installs on the machine and beacons out, you are offering APT testing. Providing a service that is basically what industry understands as pentest with one or two things you got from random APT report is not fair towards your customers. Put more effort to either understand the concept of TTP based on the REAL case scenarios or if you don’t have access to such information, make new friends in the industry. Conferences like CONFidence are a great opportunity to do that! Guys who look at alerts and respond to incidents day in, day out will help you understand the biggest challenges companies face when defending against APT guys. It will make you a better pentester, give your customers a REAL value and provide defenders with an opportunity to share the experience. Win-Win-Win.
Presenting is not easy. Important thing to remember is that you are presenting your research to someone (audience). Try to keep in mind that:
Quality of talks and research (or lack of research!). We were trying to discuss the reasons why and came up with different ideas:
The main reason why I felt in love with community is the wealth and availability of the information, research, tools, ideas, knowledge, collaboration which everyone can be part of and everyone can use. The main reason why we decided to create DFIR.IT is because we felt we want to give back to the community. I could give you plenty of examples how we helped different customers to not get cyber bullied, extorted or exfiltrated, just because some unnamed heroes carried out research, that someone turned into an amazing tool and shared with others! I cannot express my appreciation of those guys and everyone that tries to make a difference. Conferences are important part of community and a framework to meet, share and learn from each other. Let’s try to do whatever we can to keep it that way!
]]>Basic requirements:
All tools were tested on my Windows7 x64 machine with 8GB of RAM. Let’s get started!
Magnet RAM Capture is a new player in the market. Supports Windows systems including XP, Vista, 7, 8, 10, 2003, 2008, and 2012. Magnet RAM
Capture has nice and simple GUI so running it is very straightforward. It creates a raw memory dump with a .DMP
extension. If you are running
the tool from a FAT32 formatted USB stick and the host RAM you are capturing is greater than 4 GB, then segmentation feature will be very
helpful (it is disabled by default).
During my tests, Magnet RAM Capture allocated 2844K of memory.
Belkasoft Live RAM Capturer is compatible with all versions and editions of Windows including XP, Vista, Windows 7 and 8, 2003 and 2008
Server. The authors claim that they did their best to optimize memory usage. It is even available in separate 32-bit and 64-bit versions in
order to minimize it’s footprint as much as possible. The tool comes equipped with kernel drivers allowing it to operate in the most
privileged kernel mode. Thanks to GUI it is very simple to use. By default it stores memory image in current working directory. It creates a
memory dump in RAW format. The name of the output file is the current system date with .MEM
extension.
During my tests, 64-bit version of RAM Capturer allocated 2060K of memory.
MoonSols DumpIt is a fusion of old win32dd and win64dd combined into new and improved executable. It is also part of MoonSols Windows Memory
Toolkit. DumpIt offers an easy way of obtaining a memory image even if the investigator is not physically sitting in front of the target
system. It is designed to be provided to a non-technical user. Only a double click on the executable and confirmation is enough to generate a
copy of the physical memory in the current directory. A .RAW
memory image named for the host name, date and UTC time will result.
Unfortunately free of charge version I used (1.3.2.20110401) is a few years old and is not developed any more. There is also commercial version available with LZNT1 compression and RC4 encryption features, but of course it is not free and therefore does not meet our basic requirements.
During my tests, DumpIt allocated only 780K of memory. Great result.
WinPMEM is actively developed open source utility. It is part of Rekall Memory Framework. WinPMEM has never let me down. It acquired 64GB memory image from Windows 2008 Server. Compared to the previously described tools, WinPMEM has a number of interesting features:
\\.\pmem
deviceWinPMEM is slightly harder to use. It can be run only from command line which makes it ideal for scripting purposes. Your script can be deployed on a USB stick and do the job for you. My personal favourite feature is writing images to standard output (STDOUT). For example, you can use it to transfer memory image directly to a remote machine:
winpmem_1.6.2.exe - | nc 10.0.0.1 1234
Or to create a password protected archive on the fly:
winpmem_1.6.2.exe - | 7z a -si -bd -pSECRET
During my tests, WinPMEM allocated 1596K of memory. You need to remember that in combination with other tools like nc or 7z, memory consumption will be higher.
Well, the chart speaks for itself.
]]>Big THANK YOU to:
DFRWS EU started with Digital Forensics Framework workshop - if you’ve never used this framework - go and play with it as soon as possible and consider DFF when building IR toolkit. DFF features include reconstruction of VMware ‘vmdk’ files, support for multiple operating systems (Windows, Linux, OS X) file formats, memory analysis and many more. Workshops could have been ideal if participant were allowed to downloaded forensic images and install software before the class started. Sharing all the data via USB sticks with dozens of people was not the best idea ;)
Next was The Decision and it was extremely difficult where to ‘take our talents next’. Rekall and GRR workshops were conducted in parallel. As a clever bastards we’ve decided to split and share the knowledge and materials. It turns out we were not clever enough, Micheal Cohen workshops quickly extended the available space in the room..
Nevertheless, Andreas Moser workshop was a great hands on introduction to GRR open source project. Workshop allowed participants to collect and analyze forensics artifacts and hunt for evil. GRR has all the features that Incident Responders want to have to quickly react and respond to threats. It took us few seconds after workshop to decide - we are setting up some testing infrastructure with GRR. Stay tuned for more GRR goodies on DFIR.IT
The Search for MH370: Lessons from Inmarsat’s Flightpath Reconstruction Analysis
Even though this was not a typical computer forensics topic, “The Search for MH370…” was amazing presentation that reminded principal rule: even without sufficient data, investigators should always find a way to perform analysis.
Hviz: HTTP(S) Traffic Aggregation and Visualization for Network Forensics
Researchers presented analytical approach how to filter out noise and aggregate data in order to detect data exfiltration. One of the most interesting research papers on DFRWS. Authors promised to released the code after the conference. For the time being you can play with demo version here.
Technical case study that outlined the artifacts left on the system by Tor Browser. Apart from standard forensics go to places (vss, registry, prefetch files, etc) authors focused on artifacts left in memory and pagefile.sys
which can be found, for instance by looking for HTTP-memory-only-PB string. It might be interesting to compare the usage of all the artifacts created by browsers in terms of private browsing or incognito mode.
Fast and Generic Malware Triage using openioc_scan
Universal methodology of anomaly detection using memory IOC. Amount of data and artifacts stored in system memory snapshot allow openioc to detect UAC bypass, code injections, lateral movement and much more badness!
Characterization of the Windows Kernel version variability for accurate Memory analysis
Micheal Cohen focused on Windows Kernel version variability and its effect on memory analysis. One of the differences highlighted during presentation was that struct layout does not change within same minor versions which is not the case for kernel global constants. Fundamental differences between Rekall and Volatility is how frameworks build profiles and how struct layout and finding kernel global constants might not only affect quality but be more prone to errors and susceptible to anti-forensics.
Acquisition and Analysis of Compromised Firmware Using Memory Forensics.
Most of the memory acquisition tools will acquire memory marked as RAM by OS, which will skip firmware memory ranges. In the light of recent events (Equation group, MAC persistent backdoor) ability of collecting firmware memory might be essential for investigators. Authors presented that firmware acquisition can be achieved by parsing configurations spaces of PCI devices and enumerating all MIMO regions which would be excluded when acquiring memory. In addition to that authors build volatility plugin for dumping ACPI tables to file system.
Smart TV Forensics: Digital Traces on televisions
Researchers focused on investigating the digital traces found on SMART TVs. According to them, one of the biggest challenges is data acquisition. Even though, Smart TV from a hardware perspective is an embedded device, authors had to test different ways to obtain the data including eMMC five-wire method, NFI Memory Toolkit II and rooting the device. Analysis of the collected data allowed investigators to view system and network information, web browser and custom application activity.
For the sake of this example I’ve decided to use this list which includes IP addresses, domains and most importantly: context! Context should be part of every IOC list that you create. It doesn’t matter if the list is build based on known traffic patterns, OSINT research or tip off. Even though there might be additional overhead, having context will pay off in longer run.
List format example:
1 2 3 4 5 6 7 8 9 10 |
|
Let’s start by extracting all the domains:
1 2 3 4 5 6 7 8 9 10 11 |
|
For those who don’t feel comfortable with command line:
#
character/
with new line character \n
sed s/MatchString/ReplaceWithThisString
).
domains-IOC
fileExtracted list of domains (part removed for brevity):
1 2 3 4 5 6 7 8 9 10 11 12 13 14 15 16 |
|
Now, we can use our list to search for evil in the proxy logs:
1
|
|
For each line in the domains-IOC
file the above code snippet will search for corresponding entry in the proxy log file.
If your SIEM solution or other detection platform allows you to access some backend that stores historic data about network connections you should consider yourself a lucky analyst. Let’s assume this backend allows you to use raw SQL queries. Body of such SQL query can be easily pre-generated with command line:
1
|
|
1 2 3 4 5 6 7 8 9 10 11 12 13 14 15 |
|
Now the only thing left is to add a header with SELECT statement and a table name. This might be extremely useful and time saving especially if your list contains hundreds of entries!
Let’s assume you found malicious domains in your proxy logs - for instance a hit on a Sweet Orange gate:
1 2 |
|
This is where context kicks in:
1 2 |
|
with this information one click later analyst can review chain of the events.
In this case most probably redirect to EK page did not happen as there were no hits in proxy logs for the following URLs:
h.useditems.ca:8085
k.vidihut.com:8085
However with the context available an analyst knows exactly what to look for and how to determine whether activity was successful or not. It is definitely worth mentioning that EK gates stay active for a longer time, this in turn quite often leads to interesting findings like new compromised domains or landing pages. Just follow this example:
1
2
200 TCP_NC_MISS GET UnknownCompromisedWebsite.com 1.1.1.1 80 / - DIRECT
200 TCP_NC_MISS GET static.matthewsfyi.com 50.87.151.146 80 /k?tstmp=3600039285 hxxp://UnknownCompromisedWebsite.com/ DIRECT
Analysis of HTTP referer field provides information about previously unknown compromised domain.
Above queries allowed analysts to not only identify connections to bad domains but more importantly allowed them to use context to confirm/deny if traffic was indeed malicious and resulted in successful exploitation. That’s pretty cool! But hey, there’s more! Bad guys quite often will use a different C&C infrastructure for the same type of malware. Basically it is far more easier to change C&C for given malware sample rather than to re-code the communication function/method. This means that malware will use similar communication pattern when connecting to different C&C.
Enter pattern matching!
URL pattern matching is an effective way to detect the same type of network traffic communication even though bad guys use different IPs/domains. For instance let’s take a closer look at Cryptowall C&C.
1
|
|
Detection could be achieved with the following regular expression:
1
|
|
Above expression will match .php?
followed by:
This works for both real time detection and also hunting on historic data.
Happy Hunting!
Update
I’ve noticed the original list is no longer available on www.malware-traffic-analysis.net. You can grab a copy of the extracted domains list from GitHub if you want to play with it.
]]>Network X is an isolated, highly secured and monitored part of the network where Nation’s Secrets are stored. Team responsible for monitoring the infrastructure reports suspicious activity on one of the servers WIN-UC6FN0KAUGQ
(10.10.100.100
) including failed authentication attempts, originating from a host within the same geographic location as network X. The suspected machine’s is WIN-569IC7NK834
(10.10.100.50
). IR team was called to investigate. Reported time of the suspicious activity: 2015-01-28T19:30:24Z
.
Every investigation is all about getting as much context as possible. This gives handlers better understanding of what happened and in turn it influences decision what to do next. At this point the only available information are few suspicious authentication attempts. Data collected by Redline’s Comprehensive Collector would be the best option to start our initial investigation.
Collection steps include:
Where do we start? Each investigation is different and each handler has its own style. For most of the investigation one of the following strategies should yield satisfactory results:
This one is fairly simple the only requirement is to have approximate time of suspicious activity.
Let’s test this approach in on our scenario.
Collected data can be loaded in Redline by double clicking the .mans
file and selecting the type of investigation:
On the Analysis data panel select Timeline:
Redline will build the timeline based on all collected events. Next step is to define a TimeWrinkle which is a basic filter that will show only entries within defined time frame.
One of the Windows Event Log entries close to the time of suspicious activity correlates with the usage of explicit logon credentials by user PMac
against the target machine.
Let’s see what happened before user PMac
tried to authenticate.
Processes cmd.exe
and conhost.exe
were spawned by the user PMac
two minutes before the explicit logon event. It might be worth checking memory ranges for conhost.exe
as this process usually holds history of user’s activity in a Windows command line (this is true for Windows 7/2008R2 or higher, for earlier versions you should focus on csrss.exe
memory ranges). Dumping memory for given process with Redline can be easily achieved. Double clicking on conhost.exe
displays the process information page. Select MRI Report and hit Acquire Process Address Space (assuming collector acquired memory). All memory ranges for given process will be extracted in the background. Let’s not waste time and continue with the timeline analysis.
There was nothing interesting in the timeline until we stumbled across the following entry: suspicious m64.exe
file in a root directory.
Next step would be to get the file and perform initial analysis. Unfortunately Redline collects information about the metadata of the files within filesystem. File would have to be extracted manually, for instance by the same administrator that run the collector (sometimes it is possible to extract files from the memory image using e.g Volatility).
Now it is time to take a closer look at what happened in our timeline after the explicit logon attempt occurred.
Initial report mentioned few suspicious logon attempts. Using search feature we can look for other explicit credentials events:
Apparently user PMac
tried to use Rob
’s account…
Mike
’s account…
and Bob
’s account against the target server:
Interestingly enough the time differences between the logons were very short and suggest more of an enumeration activity.
Let’s get rid of the filter and examine closely all related entries for each explicit credentials event log entry. Nothing interesting for the first two logons, however entries surrounding third explicit logon give us more details. Registry changes suggest some sort of network activity, which might be related to accessing a network share on our protected target server by user Bob-ADC
. This doesn’t look good at all!
Let’s summarize the findings of our analysis so far:
m64.exe
was present in the root directory on WIN-569IC7NK834
(10.10.100.50
) before suspicious logon started.WIN-UC6FN0KAUGQ
(10.10.100.100
).WIN-UC6FN0KAUGQ
(10.10.100.100
) was recorded in the Windows registry on WIN-569IC7NK834
(10.10.100.50
).There is still plenty of stuff to investigate further. What about the conhost.exe
memory ranges? Redline finished dumping the files to disk after few minutes so it’s time to review memory ranges with good old strings.exe
from Sysinternals.
After endless scrolling through strange hex, numbers and letters eventually a needle in a haystack was found!
Strings inside the conhost.exe
process memory revealed commands executed on the host WIN-569IC7NK834
(10.10.100.50
) by user PMac
(everyone loves memory forensics!):
C:\Users\PMac.LAB>net view
Server Name Remark
----------------------------------------------------------------
\\WIN-569IC7NK834 Lab-Desktop
\\WIN-UC6FN0KAUGQ Secure-Lab1
The command completed successfully.
C:\Users\PMac.LAB>net use X: \\WIN-UC6FN0KAUGQ\C$
The password is invalid for \\WIN-UC6FN0KAUGQ\C$.
Enter the user name for 'WIN-UC6FN0KAUGQ': PMac
Enter the password for WIN-UC6FN0KAUGQ:
System error 5 hasoccurred.
Access is denied.
C:\Users\PMac.LAB>net use X: \\WIN-UC6FN0KAUGQ\C$
The password is invalid for \\WIN-UC6FN0KAUGQ\C$.
Enter the user name for 'WIN-UC6FN0KAUGQ': Rob-ADC
Enter the password for WIN-UC6FN0KAUGQ:
System error 5 hasoccurred.
Access is denied.
C:\Users\PMac.LAB>net use X: \\WIN-UC6FN0KAUGQ\C$
The password is invalid for \\WIN-UC6FN0KAUGQ\C$.
Enter the user name for 'WIN-UC6FN0KAUGQ': Mike-ADC
Enter the password for WIN-UC6FN0KAUGQ:
System error 5 hasoccurred.
Access is denied.
C:\Users\PMac.LAB>net use X: \\WIN-UC6FN0KAUGQ\C$
The password is invalid for \\WIN-UC6FN0KAUGQ\C$.
Enter the user name for 'WIN-UC6FN0KAUGQ': Bob-ADC
Enter the password for WIN-UC6FN0KAUGQ:
The command completed successfully.
C:\Users\PMac.LAB>dir X:
Volume in drive X has no label.
Volume Serial Number is 16EE-2261
Directory of X\
01/25/2015 04:43 PM <DIR> inetpub
07/14/2009 03:20 AM <DIR> PerfLogs
01/25/2015 05:19 PM <DIR> Program Files
01/25/2015 04:28 PM <DIR> Program Files (x86)
01/25/2015 05:41 PM <DIR> Users
01/25/2015 06:55 PM <DIR> Windows
0 File(s) 0 bytes
6 Dir(s) 16,423,743,488 bytes free
C:\Users\PMac.LAB>xcopy C:\m64.exe X:\ /K
C:\m64.exe
1 File(s)copied
C:\Users\PMac.LAB>dir X:
Volume in drive X has no label.
Volume Serial Number is 16EE-2261
Directory of X:\
01/25/2015 04:43 PM <DIR> inetpub
11/20/2010 09:29 PM 302,592 m64.exe
07/14/2009 03:20 AM <DIR> PerfLogs
01/25/2015 05:19 PM <DIR> Program Files
01/25/2015 04:28 PM <DIR> Program Files (x86)
01/25/2015 05:41 PM <DIR> Users
01/25/2015 06:55 PM <DIR> Windows
1 File(s) 302,592 bytes
6 Dir(s) 16,426,651,648 bytes free
So what exactly happened here?
Someone tried to view the available network resources with the net view
command and then failed to mount a remote share using different accounts (PMac
, Rob-ADC
, Mike-ADC
). The last attempt using Bob-ADC
credentials successfully mounted network share. After that the attacker copied suspicious file m64.exe
to remote location. If the file was not suspicious enough when we’ve looked at it for the first time, now it would be really good to speed up our malware analysts to get as much information as possible regarding the file.
Building IOCs is based on the Boolean logic and keywords. For instance we can use Event Log ID 4648 to look for any existence of explicit credentials in Event log:
Let’s assume that malware analyst came back with the results: m64.exe
is recompiled version of Mimikatz - a well known password dumping tool.
For instance an IOC can be built based on the name for both 32 and 64 bit platforms, extension and MD5.
In real case scenario this would be a good time to gather all the findings from the initial investigation and sweep across estate for more machines that indicate similar suspicious activity. It would be a good starting point to extract all activity of compromised accounts from the Domain Controller and run IOC collectors on all machines where any of those accounts were recorded. It might be worth considering to add collection of all event logs and/or memory to your collector.
When analyzing the data collected by the IOC Collector open the analysis file and select:
Select the folder with IOCs:
Choose IOCs:
The report will be generated in the background. When it is ready click the IOC Report on the bottom left side and review your IOC report.
You found more indicators of compromise on other machines? Cool now you can iterate through our process with the new findings.. Repeat the same process over and over again in order to understand what exactly happened. Eventually this will allow you to get rid of the bad guys, sharpen your tools and be more prepared for another round!
Feel free to stick around for part 3 of the series if you want to learn more about other tools to analyze data collected by Redline.
]]>You are working as a full time Incident Responder or it might be that you are working as a consultant and use your knowledge and expertise only whenever security incident hits your organization. Never mind the details, incident is declared! Someone is inside your network, it all started with information about strange behavior - suspicious logon attempts from different admin accounts to your highly secured part of a network. One of the servers used for unsuccessful logon attempts contained suspicious executable which after short initial analysis seems to be well known password dumping tool. Insider? APT? Management is highly interested, pressure is growing. Someone may think: ‘Yep just another day of an Incident Handler’
In a perfect world, you would be working for an organization that has all the tools and processes in place. You grab your jump bag, take your corporate credit card and go directly on site to investigate. No? So your company only does it remotely? Fair enough. No time to be wasted - you need to verify information and start to analyze artifacts in order to recreate what happened. You are able to remotely collect valuable data from the endpoints, perform initial assessment, review monitoring platforms, sweep estate for initial indicators, perform basic memory and file system forensics, analyze netflows, logs and finally build timelines. At the end of the day, when you have more knowledge about what happened, you can update management and plan your next steps.
Say Whaaaat? You don’t have any tools because there was no budget? You do not have a full coverage of the environment with your monitoring platforms? Management decided to use endpoint security only for the most protected part of the infrastructure and you do not have access and visibility? Your organization decided to offshore infrastructure to managed services provider and you need to collaborate with technical teams from different organization?
Pick your reason. If it makes you feel better even add your own. We live in a Murphy’s Universe. You will probably never have everything you need and yes, you can blame management and complain or you can have fun and investigate potential incident and do some cool stuff. You just need to build alternative toolset and processes as a plan B (or build it as your primary toolset if you are really screwed up and your organization finance your Incident Response capabilities with ‘Great Job!’ approach.)
IR activities can be divided into following steps:
Analysis:
Scoping:
Keep in mind that it is highly likely that you might not be the person that will execute the tools, and you will need to rely on someone (administrators, local support, janitor?) to perform one of the most crucial part of every investigation - collection of evidence - for you. Thus it would be really good to have this process automated and easy to use.
Standard disclaimer. Before we start playing with Redline it’s definitely a good idea to first test it in a safe environment! Feel free to check official documentation to be sure that you know what you are doing. This series will leverage capabilities of Redline in some example scenario and build a basic process around it. Keep in mind that if you have any other ideas, doubts or experience please feel free to share it so we could all learn from it!
Redline allows analyst to build endpoint collectors. In our scenario we will use Comprehensive and IOC Collectors. Official manual states that:
“Comprehensive Collector configures scripts to gather most of the data that Redline collects and analyzes. Use this type of Redline Collector if you intend to do a full analysis or if you have only one opportunity to collect data from a computer.”
“IOC Search Collector. The IOC Search Collector collects data that matches selected Indicators of Compromise (IOCs). Use this Redline Collector type when you are looking only for IOC hits and not any other potential compromises. By default, it filters out any data that does not match an IOC, but you can opt to collect additional data.”
Select the type of collector:
Click on Edit your script to review what data will be collected. Tick a box if you want to acquire memory. General recommendation - acquire memory whenever it is possible (legal, bandwidth, HR approvals etc.). Memory forensics is an invaluable source of information and essential part of every investigation.
At the bottom of the window select the name of the folder where collector will be stored and then press OK.
Select IOC Search Collector:
Select a folder containing indicators of compromise (see how to create IOC):
Redline will parse content of the folder and display names of all IOCs:
Select IOCs that should be included in the collector and than follow the same steps for creating a Comprehensive Collector. With know-how about building collectors, scenario in place and basic process, incident handlers are ready to collect data and investigate suspicious activity. In part 2 we will start the analysis with Redline.
If you are wondering at this point why not just pull a plug, or separate suspected machine from a network, create a forensic image and perform full blown forensics? Bear with me until the end of the series. However if you are really impatient, using collectors allows you to act faster and start investigation and basic containment while your forensic images are still uploading or waiting for segregation in Fedex storage room. Oh, by the way it is far more easier to get approval for ‘acquiring metadata’ rather than full image straight away, especially when user traffic and data is involved.
]]>